Technical SEO can be daunting, especially if you're not familiar with the topic.
But it's essential for any website owner to understand the basics of technical SEO in order to improve their website's ranking and performance.
In this blog post, I will cover the Technical SEO Checklist for 2022. This is the only checklist that you will ever need.
So without further ado, let's get started!
Technical SEO Checklist For 2022
Below is the only checklist you need to make sure you don't mess up the technical SEO of your website. In this article I have just pointed out the Technical SEO factors and not added On Page SEO Factors that you should consider.
1. Set up your website with Google Search Console (GSC)
First and foremost, you must make sure to set up your free account with Google Search Console and verify the same. Setting up Google Search Console is very easy and it will hardly take you a few minutes to get up and running.
Google Search Console is a free service offered by Google that helps you monitor, maintain, and troubleshoot your site's presence in Google Search results.
You don't need to verify your site in order to be included in Google's search results, but doing so can give you more control over how your site appears.
Google Search Console will also warn you of any errors in your website so that you can take necessary actions to fix them
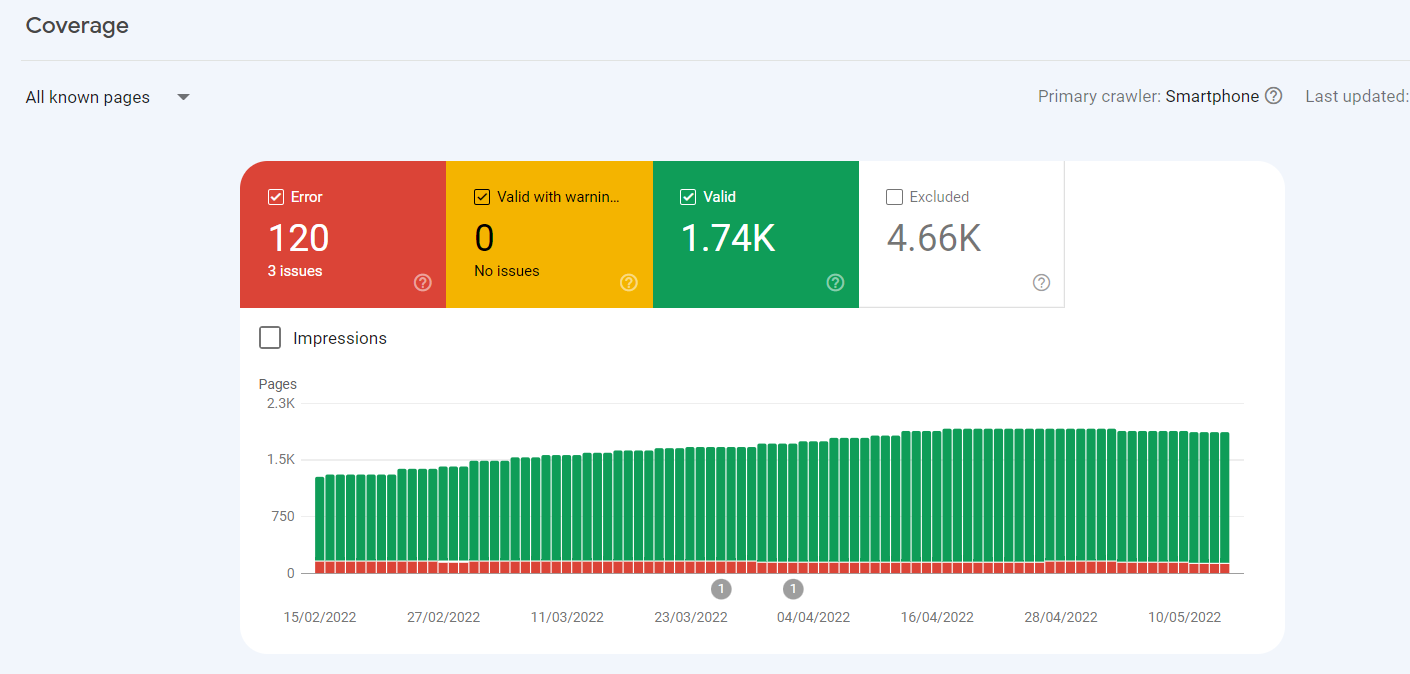
Apart from this, GSC can do a lot of other important tasks that are essential part of technical SEO. We will talk about them late in this article.
2. Use SEO-friendly URLs
Google does understand and index URLs with vague parameters. However, for better SEO, you must use clean permalinks with your keywords in the URL
If you are using WordPress you can select the following URL structure for your website.
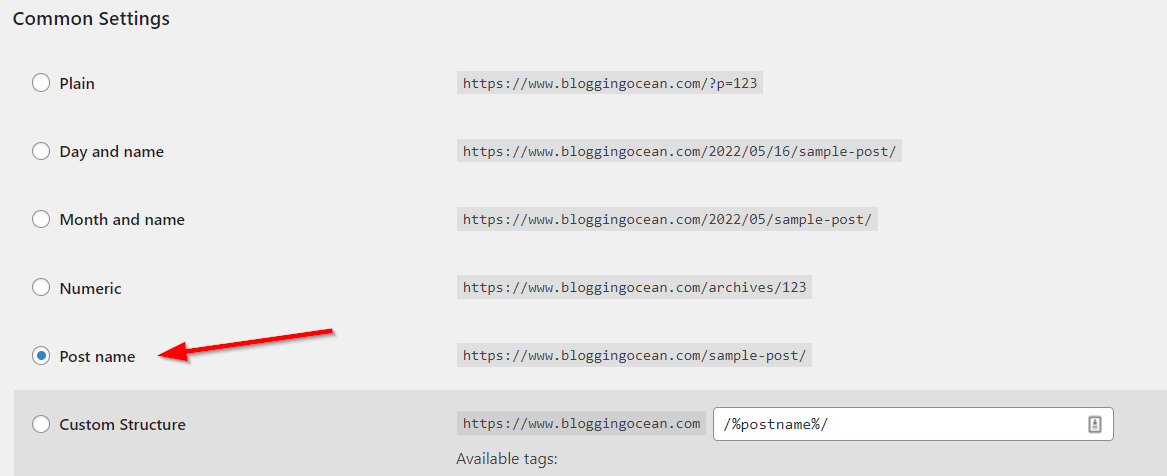
You can further optimize the URL while creating the post by editing its permalink, both in Classic editor as well as Gutenberg editor.
3. Use a no-index tag to block any pages you don't want to be indexed.
If you have pages on your website that you don't want to be indexed by Google, you can use the no-index tag. This is a meta tag that you add to the <head> section of your HTML document that tells search engines not to index the page.
When Google crawls your website and sees the no-index tag, it will continue crawling the page as well as links on it, but will not include that page in its search.
You can use plugins like Rank Math SEO and Yoast SEO to add no-index meta tag to your page or entire post type. Here's how you can add no-index in Rank Math
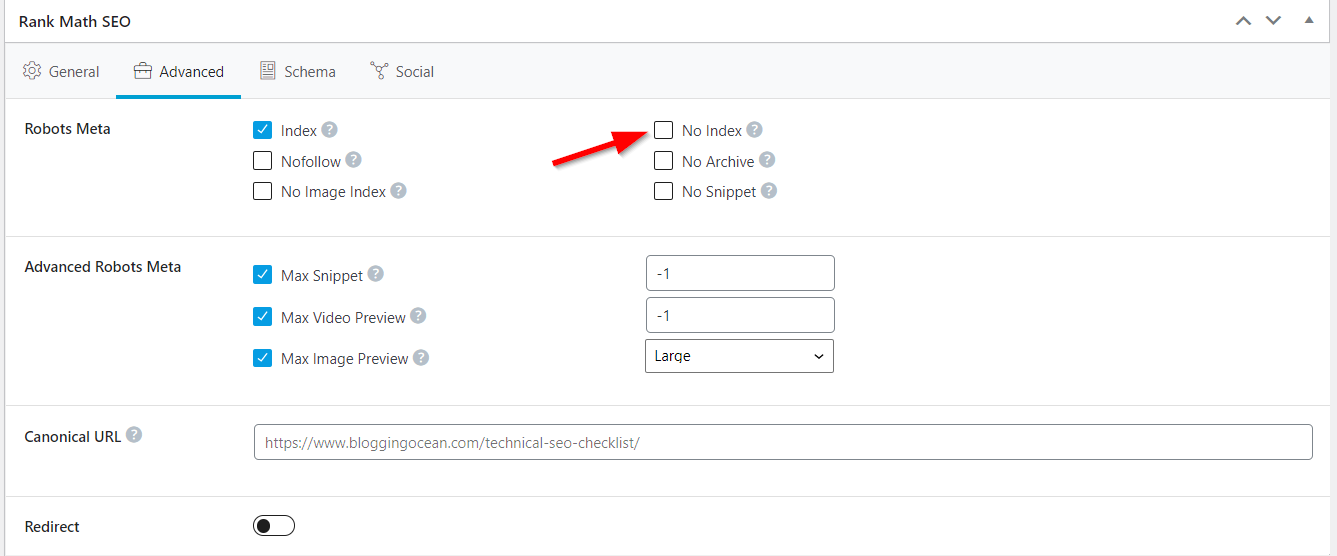
4. Optimize your robots.txt file
The robots.txt file is a text file that tells Google (and other search engines) which pages on your website can and cannot be crawled.
A common use of the robots.txt file is to block pages that are not meant for public consumption. Some of the examples include
You can specify crawl-delay to search engine bots through robots.txt. Some SEOs, including myself, also specify the sitemap in their robots.txt file.
In order for the file to work, it must be placed in the root directory of your website and be accessible by typing example.com/robots.txt in your browser. If you cannot see your robots.txt file by typing the above URL, your robots.txt file won't work.
You can find Blogging Ocean's robots.txt file at https://www.bloggingocean.com/robots.txt
5. Make Sure No-Indexed Pages are not blocked by robots.txt
One of the biggest mistakes that SEOs make is blocking the no-index pages with robots.txt. They feel this is an additional level of safety to make sure the page is not indexed.
However, as per Google, they do follow the instructions in the robots.txt file to not crawl a URL and hence not index it. However, if the URL appears elsewhere on the web, Google may still index the URL.

When you block the no-index page with robots.txt, Google will stop crawling the moment it reads the robots.txt file. Hence, it won't be able to see no-index tag and still end up indexing a URL if it appears elsewhere on the web.
6. Use Google robots.txt tester to verify robots.txt behavior
Using the right commands in the robots.txt file can be tricky. So, there are chances that you might accidentally block URLs to be indexed by robots.txt.
So, to be sure, you aren't accidentally blocking important pages or directories, you can use Google robots.txt Tester Tool, a free tool by Google to check if various Googlebots can crawl a particular page or directory.
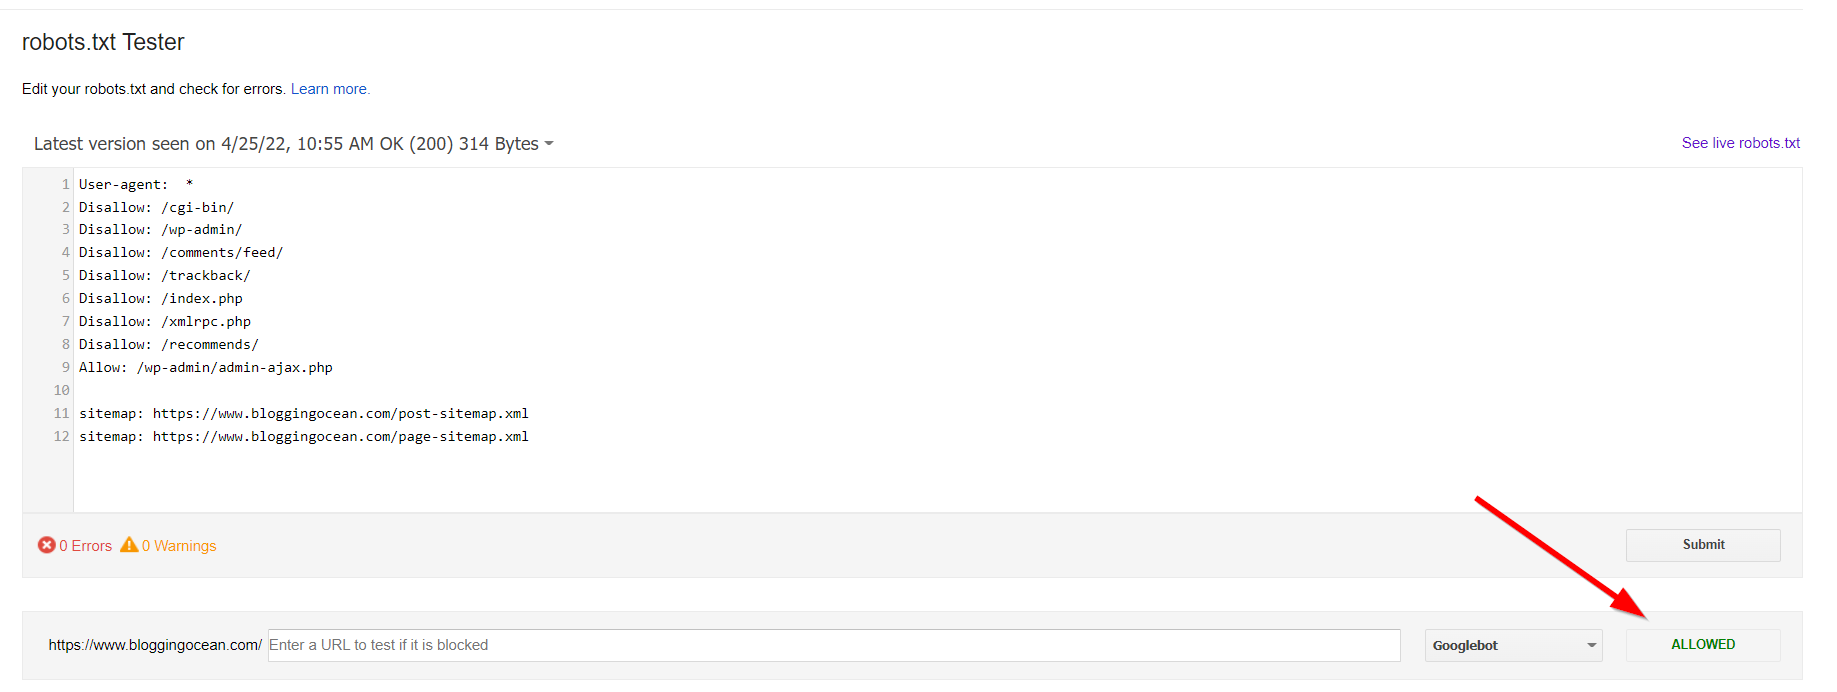
7. Make sure your website resources are crawlable
Your website's resources, such as CSS and JavaScript, need to be crawlable in order for Google to index your pages correctly.
If your block the CSS file from Google bots, Googlebots will not be able to see your web page like humans do and will throw up errors like "Clickable elements too close together"
8. Create an XML sitemap
An XML sitemap is a file that contains all the important pages of your website. It is basically a roadmap for Google (and other search engines) to find and index your web pages.
XML sitemaps can be automatically generated by most CMSs these days. If you are on WordPress, you can use Rank Math SEO or Yoast SEO plugin to generate your sitemap.
9. Submit Sitemap in GSC
Once you have generated your sitemap, the next step is to submit it to Google Search Console. This will allow Google to find and index all the pages on your website much faster.

As I said earlier, it is also a good practice to place the Sitemap URL in robots.txt file. Alternately, you can also post a link to your Sitemap in the footer section of your website.
11. Make sure the website does not contain any malware
Malware is a type of malicious software that can infect and damage your website. If your website is infected with malware, it will not only harm your website but also the visitors who land on your website.
If your website is infected by malware, Google might de-index it to make sure the users are not affected by the malware.
The most common way for malware to get into your website is through hacked plugins or themes. It can also get into your website due to security loopholes in the plugin or theme.
Most active plugins and themes make sure to release updates as and when a security vulnerability is detected. So, always make sure to keep your WordPress plugins and themes up to date.
Also, do regular scans on your website using tools like Sucuri to make sure your website is not infected by any Malware.
12. Use Hreflang Tags for Multi-language websites.
If you have a website in multiple languages, it is important to use hreflang tags to make sure the right version of the website is served to the users.
Hreflang tags basically tell Google which language the content on your website is in and also allows you to specify the alternate versions of that page in other languages.
This way, users in France are most likely to see a French version of your website in the SERP whereas users in Italy will see the Italian version of your website in the SERP.
You can add an hreflang HTML format to your website by adding the following code to your website’s header:
<link rel="alternate" hreflang="x" href="https://example.com/"/>
Where x is the language and regional code, and https://example.com/ is the URL of the page.
For example, if you have a website in English that is targeted at users in the United States, you would add the following code to your header:
<link rel="alternate" hreflang="en-us" href="https://example.com/"/>
You can also use the hreflang HTML format to specify multiple languages and regions for a single page.
For example, if you have a website in English that is targeted at users in the United States, United Kingdom, and Canada, you would add the following code to your header:
<link rel="alternate" hreflang="en-us" href="https://example.com/"/>
<link rel="alternate" hreflang="en-gb" href="https://example.com/"/>
<link rel="alternate" hreflang="en-ca" href="https://example.com/"/>
If you are using WordPress, you can use a plugin like Polylang to easily set up hreflang tags on your website.
13. Use an SSL certificate if you aren't already using one
SSL certificates are used to encrypt the data that is being sent between the user and the server. This is important because it makes sure that the data cannot be intercepted by any third party.
Google has announced that it will give preference to websites that use SSL certificates in the SERP. So, if you want your website to rank higher on Google, it is important to install an SSL certificate on your website.
If you aren't using an SSL certificate on your website, I would highly recommend you to get one as soon as possible.
Most hosting companies allow you to use a free SSL certificate from either Let's Encrypt or AutoSSL. If your web host does not support free SSL, you can get one for cheap from Namecheap.
14. Fix internal and external broken links
Broken links are the links that lead to a non-existent page. This can happen due to many reasons such as
If you have broken links on your website, it is important to fix them as soon as possible. Broken link not only leads to a bad User experience as the user lands on a 404 page, but they are also bad for SEO as it makes it difficult for Google to crawl your website, wasting your crawl budget.
To find the broken links on your website, you can use a tool like Screaming Frog or a WordPress plugin like Broken Link Checker. Once you have found the broken links, you can either delete them or redirect them to the relevant pages.
15. Check for 404 pages
404 pages are the pages that show up when a user tries to access a page that does not exist. When a user lands on a 404 page, it is a bad experience as the user is not able to find the content they are looking for.
As stated earlier, apart from affecting the User Experience, 404 pages can also negatively impact your SEO as it makes it difficult for Google to crawl your website.
Like in the case of finding broken links, to find the 404 pages on your website, you can use a tool like Screaming Frog or a WordPress plugin like Broken Link Checker.
Once you find the broken page, you can either create a new page for it or redirect it to any other relevant page.
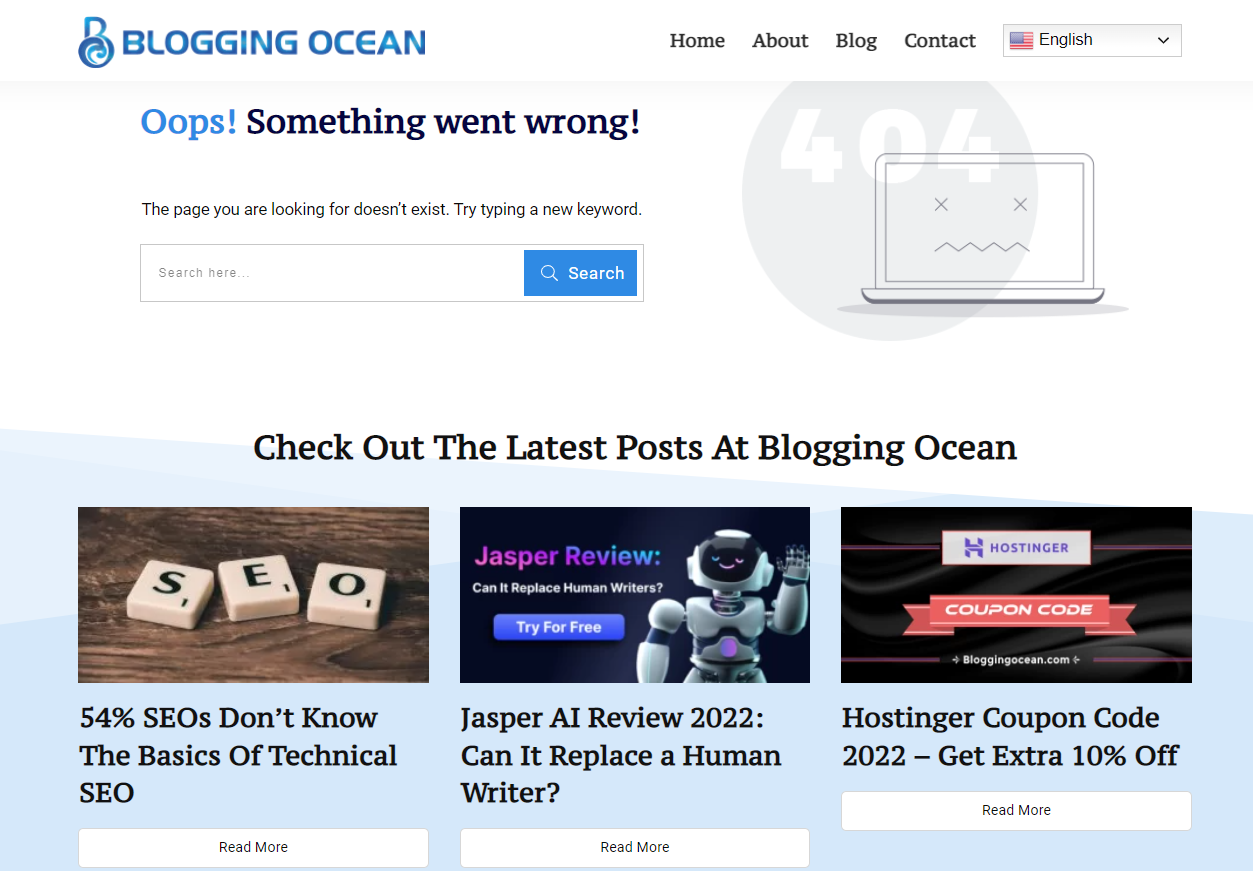
16. Design your 404 Page to divert users to related pages
A lot of times, users land on a 404 page because they mistyped the URL or they clicked on a broken link. In such cases, it is important to design your 404 page such that the user can easily find what they are looking for.
One way to do this is by adding links to your most popular articles or pages on your 404 page. This way, the user can easily find what they are looking for and you can also reduce the number of users leaving your website.
Here's how the 404 page of Blogging Ocean looks like. Though these days I redirect 404 pages to home page
17. Optimize Your Images For SEO
Images are an important part of any website as they make the website more visually appealing. However, images can also be used to rank higher on Google.
This can be done by optimizing your images for SEO. Also, on the negative side, Images can slow down your website. So, you must also make sure to optimize your image for faster load times.
Some of the things you need to do while optimizing your images are:
18. Check for any Javascript errors in the browser console
Javascript is a programming language that helps make your website more interactive. It is used to create things like sliders, pop-ups, and forms.
However, Javascript can also lead to errors which can negatively impact your SEO. So, it is important to check for any Javascript errors in the browser console and fix them as soon as possible.
You can do this by opening the browser console in Google Chrome and looking for any errors. You can also use a tool like JSLint to find and fix Javascript errors.
19. Add Open Graph Meta Tags
Open Graph meta tags are used to control how your website appears when it is shared on social media websites.
If you don't add Open Graph meta tags, then the social networks will use the default images and descriptions which might not be what you want.
So, it is important to add Open Graph meta tags to your website so that you can control how your website appears on social media websites. You can do this by using a plugin like Rank Math or Yoast SEO
20. Find Orphan Pages And Internally Link Them
Orphan pages are those that are not linked to any other page on your website. These pages are usually difficult to find and affect the crawlability of your website.
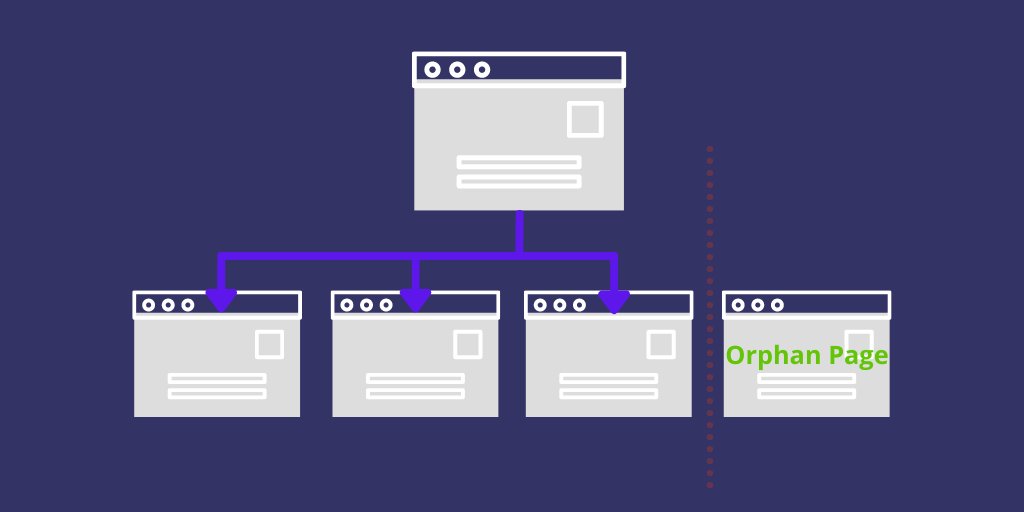
(Image Source: Glowmetrics)
To find the orphan pages on your website, you can use a tool like Screaming Frog. Once you find the orphan pages, you can create a link to them from other relevant pages on your website.
This will help Google crawl your website better and also help improve your SEO.
21. Improve Internal Linking Structure
Internal linking is the process of linking one page on your website to another. This is important for SEO as it helps Google crawl your website better.
It also helps to improve the user experience as users can easily navigate between different pages on your website.
To improve your internal linking structure, you should:
22. Get rid of doorway pages
Doorway pages are pages with mostly similar content with different variations of keywords usually created to target different locations. All these pages usually link to the same page in the funnel and add no value to the users.
They are created with the sole target of manipulating the SERP and getting more traffic to the website.
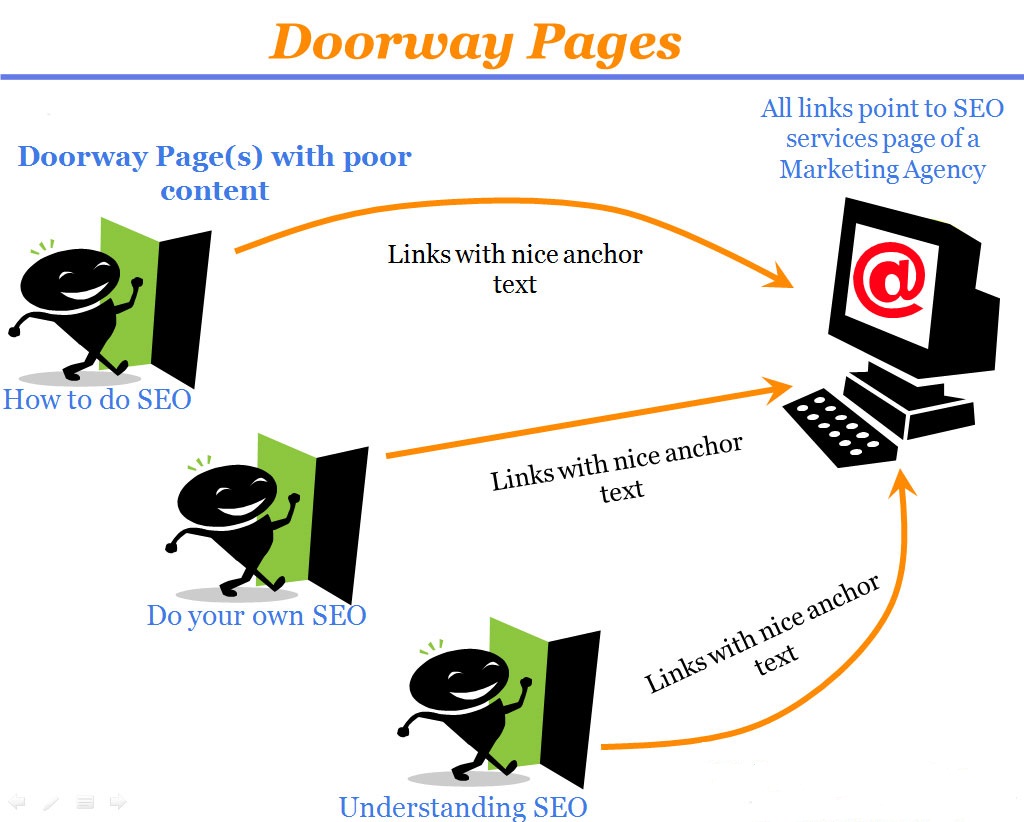
(Image Source: EMarketingBlogger)
Google has constantly updated its algorithm to get rid of these pages and such practices can result in a manual action from Google. Hence, it is advisable to remove any doorway pages that you have on your website to make sure your website is not penalized for the same.
23. Remove Duplicate Content
Duplicate content is the content that appears on more than one URL. This can happen when you have the same content on your website in different sections or if you are using categories in your URLs for multiple category page.
Duplicate content can confuse Google and it might not be able to index your content properly. This can lead to a decrease in your organic traffic.
To fix duplicate content issues, you can use either of the below methods:
24. Check Your canonical tags
A canonical tag is an HTML tag that tells Google which page on your website is the original and should be indexed. It is used to fix duplicate content issues.
If you have multiple pages with similar content, then you can use a canonical tag to tell Google which page to index. To do this, you need to add the following code in the <head> section of your HTML:
<link rel="canonical" href="http://www.example.com/">
Replace "http://www.example.com/" with the URL of the page you want Google to index.
You can also use Plugins like Rank Math and Yoast SEO to easily add canonical tags.
25. Check for keyword cannibalization in GSC
Keyword cannibalization is when you have multiple pages on your website ranking for the same keyword. This can be bad for SEO as it can split the search traffic between these pages and might result in a lower position in SERPs.
To check if you have any keyword cannibalization issues, you can go to Google Search Console and click on the Performance tab.
Next, click on any search query and then click on the Pages tab to see all the pages that are ranking for the specific search query.
Once you find the pages with cannibalization, you can either merge them into one or edit the pages to make sure they are unique and not ranking for the same keyword.
26. Use Breadcrumbs for improved navigation
Breadcrumbs are a great way to improve the navigation of your website. They help users to easily find their way around your website.
Breadcrumbs also help Google to understand the structure of your website and index your pages properly.
Most themes on WordPress come with an in-built breadcrumb option. If not, you can use plugins like Yoast SEO or Breadcrumb NavXT to create Breadcrumbs.
Here's how Breadcrumbs look on Blogging Ocean
27. Optimize your crawl budget
The crawl budget is the number of pages Google crawls on your website in a given period. It depends on various factors like the size of your website, server speed, etc.
You can check your crawl budget in Google Search Console under the Crawl Stats section. If you see that Google is not crawling all the pages on your website, then you need to optimize your crawl budget.
There are several ways to optimize your crawl budget, these include
28. Make sure your site is mobile-friendly
Google announced in 2015 that they would be using mobile-friendliness as a ranking factor. This means that if your website is not mobile-friendly, then you will be at a disadvantage in the SERPs.
You can check if your website is mobile-friendly or not by using Google’s Mobile-Friendly Test tool.
If your website is not mobile-friendly, then you need to change your website design. You can either create a separate mobile version of your website or use a responsive design.
Almost all WordPress themes these days are mobile-responsive.
29. Improve your page load times
Google has said that page speed is a ranking factor. Although they did verify that it's not a major ranking factor, still, your ranking might suffer if your website takes ages to load.
You can check your page speed using Google’s PageSpeed Insights tool.
To improve your page speed, you need to do things like:
30. Add appropriate Schema Markups
Schema Markups are a code that you can add to your website to help search engines understand your content better.
For example, if you have an article on your website, then you can use schema markups to tell Google that it’s an article and to show other information like the author, date, etc. in the SERPs.
With Review Schema, you can even show star ratings in the SERPs which can help you stand out from the competition. You can compare how the SERP Results looks with and without Review Schema Markup
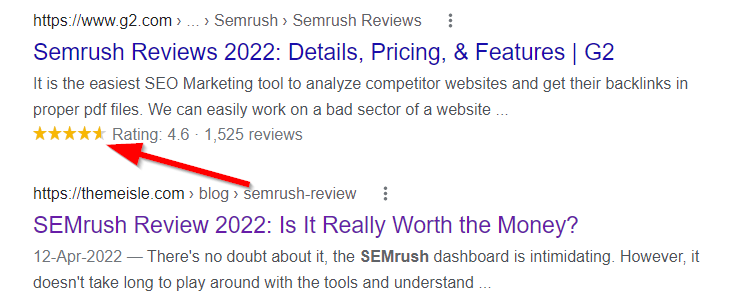
Adding schema markups is a bit technical and requires you to edit your website’s code. If you are not comfortable with that, then you can use WordPress Plugins like Rank Math and All In One Schema Rich Snippets
31. Make sure your Analytics is set-up correctly
Google Analytics is a powerful tool that allows you to track your website’s traffic and performance. It’s essential for any website owner.
You must make sure the Google Analytics code is properly set up on your website and is tracking visits to your website. To do so, you can head over to Google Analytics and click on Admin option in the left hand navigation menu.
Next, under the property section, click on Tracking info and then click on Tracking code from the drop-down menu. You can now see the status option as shown in the image below
If it shows the message "Receiving traffic in past 48 hours" the code is working correctly. If not, you can click on the Send Traffic button to send artificial visitor to your website. If it's working, you will see 1 active user.
32. Test your entire set-up from multiple devices
You should always test your website’s design and functionality from multiple devices. This includes testing things like
Tools like Browser Stack and LambdaTest allow you to see what your content looks like on different devices.
Final Words
Technical SEO is a vast and complex topic. In this blog post, I tried my best to cover almost all the important technical SEO factors that you need to focus on.
But if I have skipped any important Technical SEO factor, make sure to share it in the comments below.


