So, planning to start a blog in 2023?
Being a full-time blogger who earns his bread and butter by blogging, I can say you've made a great decision.
I've been blogging for the past 7 years and in this step-by-step tutorial on how to start a blog in 2023, I'll be sharing all my experience and tips to help you start a beautiful full-fledged blog for just $35.4.
Yes, you heard that right. You have to shell out exactly $35.4 to start a blog. Nothing more. It is that cheap.
So, excited? Great, so let us get started.
This article is extremely detailed with 8000+ words and covers everything beginners need to know about starting a blog in 2023.
Are you an advanced users? You can skip the introduction and go straight to the Step 5
Go To Step 5: Purchasing A Web Hosting And Setting Up WordPress Blog
Or maybe straightaway get started with a blog?
What Is A Blog?
A Blog or Weblog is a website with Dynamic content, i.e. whose content changes often. Blogs usually cover everything ranging from personal opinions about a topic to product reviews to
On a blog, the content is listed in the reverse chronological order so that you can find the latest content right at the top.
How To Start A Blog In 2023
Below are the exact steps you need to follow to start a blog in 2023.
Step 1: Choose Your Blogging Niche
Before you even set up your blog, there are a few things you have to decide on. The first of these things is selecting a Blogging Niche.
A niche is a topic around which your blog will revolve. It should be something that you are passionate about and comfortable writing about.
For example, I'm a full-time blogger and at Blogging Ocean I mostly write about Blogging Tips & Tricks and stuff related to it. This is the Niche of my blog.
Is It Necessary For Me To Pick A Niche?
Unlike most people think, picking a niche is a critical part of blogging. Imagine you were to buy a laptop. You suddenly find an article on Best Laptops To Buy In 2023 on your favorite cooking blog.
How comfortable would you feel about the advice you read?
Probably not very comfortable. Right?
And that's because your favorite cooking blog has nothing to do with Laptops and so the advice you might be getting there may not be from a professional.
And Google too thinks the same way. That's the reason, Google usually ranks niche blogs over general category blogs on the SERP. And to be successful as a blogger, you must rank high on search engines, especially Google.
Tips To Choose The Right Niche For You
Below are some of the things that you need to consider while choosing a niche
1. Demand For Content In This Niche?
The niche you are choosing must be in demand. That means there should be people actively searching for information and products related to your topic.
If no one is searching for it, who is going to read your blog? And if no one is going to read your blog, how are you going to make money from it?
2. Potential For Affiliate Marketing?
I've been into affiliate marketing since the very beginning and I consider it to be the best way to monetize your blogs.
In Affiliate Marketing, companies pay you a certain percentage of their product's price or a fixed amount as a commission whenever someone buys their product using your special link called an affiliate link.
For example, Amazon pays up to 20% of the product price as a commission when someone clicks on your affiliate link and makes a purchase on Amazon.
Now, not all niches are suitable for affiliate Marketing. So, you must focus on niches where there is a scope to promote affiliate products.
3. Your Passion
Blogging can be boring sometimes. And if you don't love what you're writing about, you'll soon get bored and quit. So, it's always great to work on a niche that you are passionate about.
However, I see a lot of blogging gurus suggest that you can solely pick a niche based on your passion. Or at least you should give it the most importance. This is absolute crap.
That's because, if you pick a niche that ain't making any money for you, no matter how much you love it, you will be forced to quit it for something that generates you income.
So, make sure you don't buy such stupid arguments.
4. Expertise In The Niche
You must have some expertise in the topic you are writing about. That's because, in order to keep your readers engaged, you must be able to communicate with them and provide solutions to their problems.
True, you can always research and write about a topic. However, no matter how well you research, your lack of expertise would be reflected in your content.
5. Competition In The Niche
Ideally, you should pick a low-competition niche with a high search volume. However, finding such niches is extremely difficult in 2023.
But, the good news is that most niches have some untapped areas which you can target to get a good amount of traffic to your blog. And if you can create engaging articles for these keywords, Google might as well rank you for highly competitive keywords in the niche.
So, even though your first priority should still be finding low-competition keywords, unlike other blogging gurus, I won't suggest you be adamant about it. In 2023, great content is very much capable of outranking high-authority blogs in the niche.
Step 2: Pick A Blogging Platform
A Content Management System (CMS) is a piece of software that helps you build and manage your website without writing a single line of code. It provides an easy-to-use interface that allows you to add, edit, and manage the content of a website. A CMS used for blogging is often called a blogging platform.
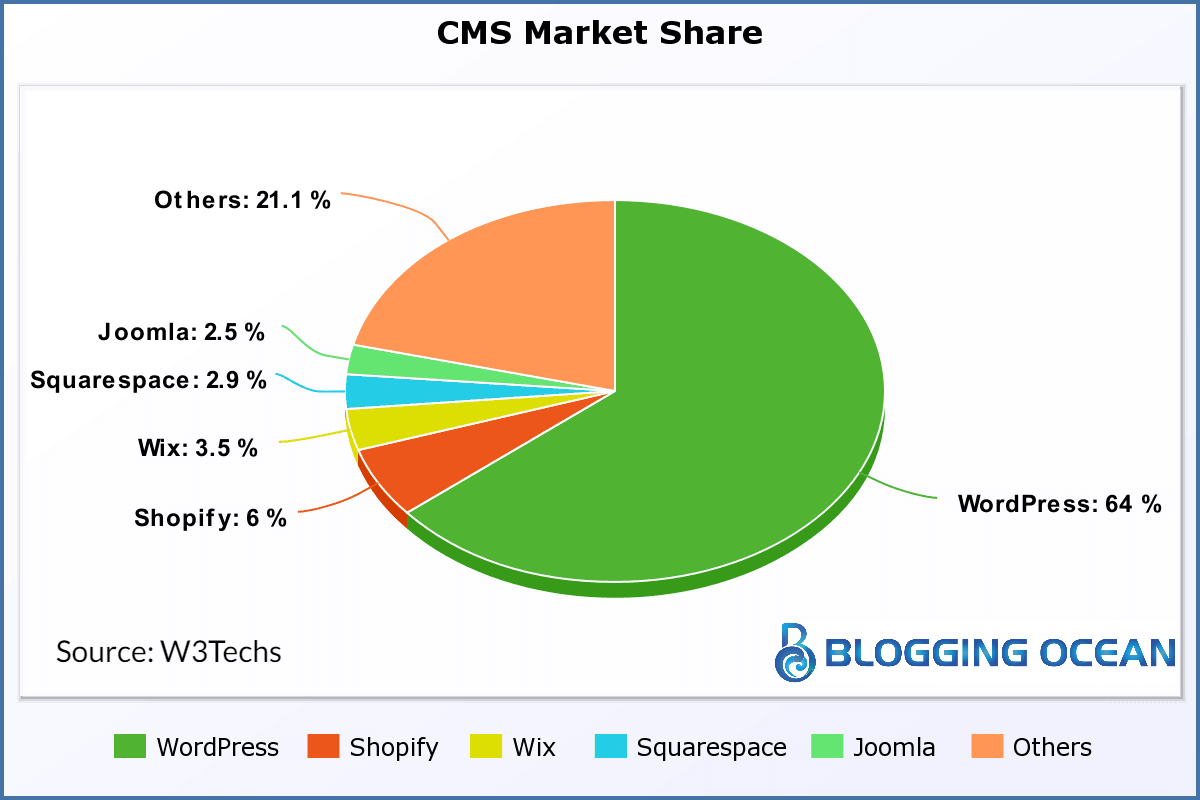
While you have many blogging platforms available in 2023, this one is still a no-brainer. WordPress is by far the best and most widely used Blogging Platform powering more than 40% of all websites on the internet and more than 60% of websites using a Content Management System (CMS).

The above image shows the CMS Market share. As you can see, WordPress is way ahead of the rest.
The WordPress data above includes Self Hosted WordPress (WordPress.Org) as well as WordPress.com websites. However, the two are different in several aspects. Let us briefly check the difference between the two
WordPress.Org V/s WordPress.com
Self-hosted WordPress is a CMS or blogging software used to create and manage your website. You need a Domain Name as well as a Web Hosting server where you can install WordPress Software to be able to create a WordPress Website.
WordPress.com, on the other hand, is a complete solution that offers web hosting with WordPress pre-installed. You also get a free sub-domain so that you don't have to buy your own domain name.
On the face of it, WordPress.com looks like a simpler and cheaper solution for beginners. However, it does have its limitations when compared to WordPress.Org:
So, if you are serious about blogging and want to create a profitable blog, I would recommend going for the self-hosted WordPress i.e. WordPress.org.
That's what all professional bloggers including myself use and it is very easy to set up as well. So, don't let the technical mumbo-jumbo scare you away.
Step 3: Choose A Domain Name
A Domain name is the name of your website. It's the web address that you type in the browser to access a website, e.g., bloggingocean.com.
Just like you need a physical address to refer people to your house, you need a domain name that directs people to your web hosting server from where they access your website.
One of the most common mistakes that bloggers make is choosing the wrong domain name. Remember, getting a good domain name for your blog is as important as giving a good name to a newborn baby. This is because your domain name will be your identity for as long as your blog is live on the world wide web.
Of course, you can change it at a later date. However, the whole process of changing your domain name is as complicated as changing your name, and if done wrong, you will risk ruining an established blog.
Below are some of the points you can keep in mind while choosing a domain name.
Tips To Select A Perfect Domain
A WordPress website is made of several files including images, HTML, PHP, JS, and CSS. To be able to access your website, the user's browser has to download these files.
Hence, you need to store these files on a server that is powered on and connected to the internet 24x7. While you can use your own computer to host your website, the moment you turn off the computer or it gets disconnected from the internet, your website will go down.
So, barring large enterprises like Google and Facebook, almost all businesses including bloggers rent a web hosting server to host their websites.
Which Web Hosting Provider Is The Best?
While there are several hosting companies available in the market, I'd recommend using Dreamhost as it is easy on your pockets and also has a good customer support team if you get stuck.
Which Dreamhost Plan To Choose?
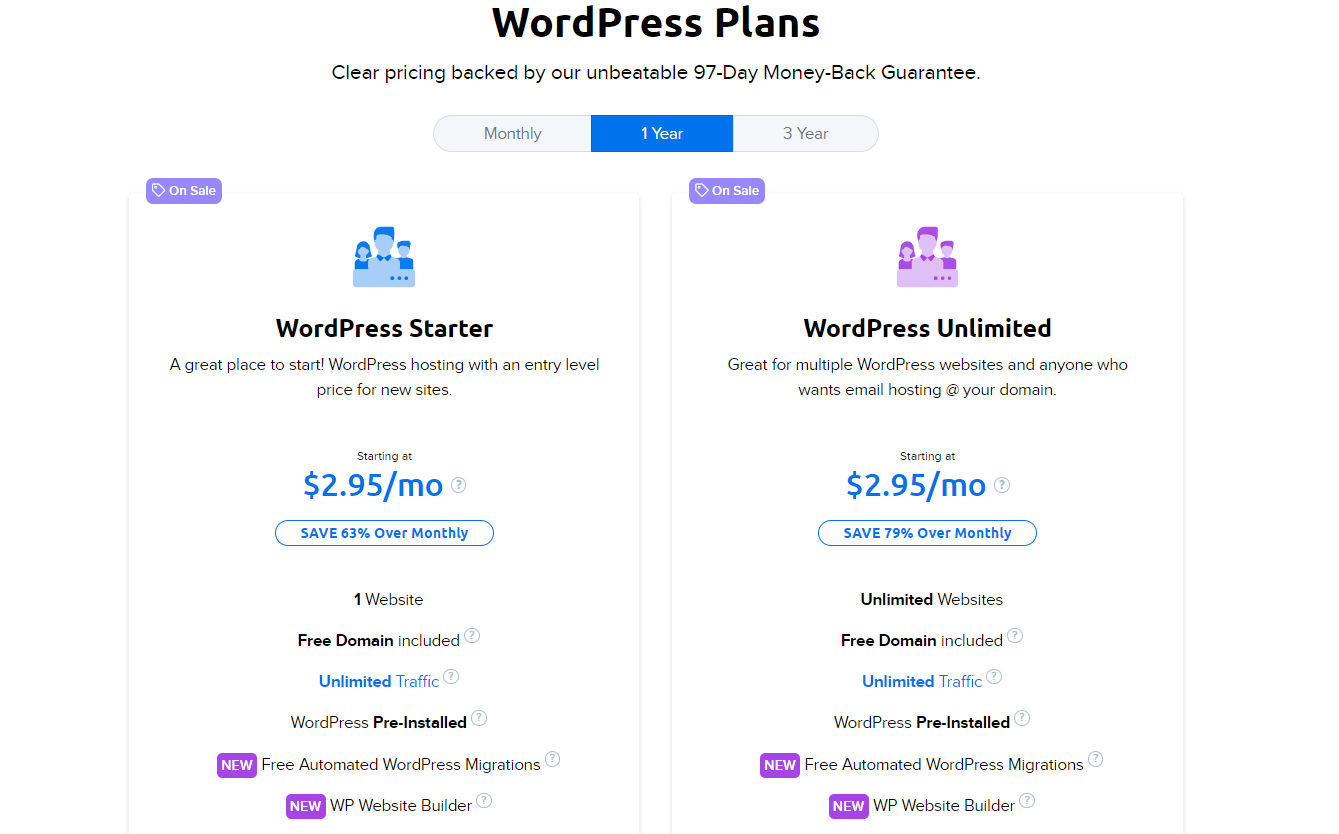
Dreamhost offers 2 different plans, the WordPress Starter plan, and WordPress Unlimited plan. With the WordPress Starter plan, you can host 1 website. For annual and longer billing duration, you also get a free domain name. SSL certificates are also included for free. However, you have to pay extra for the free email
As for the WordPress Unlimited plan, as the name suggests, it allows you to host unlimited websites. SSL as well as free emails are also included with this plan. Like the WordPress Starter plan, you get a free domain name for annual and longer billing duration plans.
However, for annual billing, both these plans are priced at $2.95/month. So, it's a no-brainer that you should go with the WordPress Unlimited plan for a 1-year duration.
Why Don't I Recommend Bluehost Or Hostgator?
If you are here after reading articles from other bloggers, you might have noticed that almost all the bloggers recommend you buy Bluehost. So, why am I not recommending you go with Bluehost?
So, let's compare Bluehost and Dreamhost side by side. I am highlighting the winner for each category by bolding it.
Factors | Bluehost | Dreamhost |
|---|---|---|
Hosting Price for 1 year | $35.4 | $35.4 |
Domain Name | Free for 1st year | Free for 1st year |
Domain Privacy | $11.88/Year | Free |
Total Cost For 1 Year | $47.28 | $35.4 |
Number of Websites | 1 | Unlimited |
Money-Back Guarantee | 30 Days | 97 Days |
Trustpilot Rating | 4.1/5 | 4.8/5 |
HostAdvice Rating | 2.4/5 | 4.3/5 |
From the above table, you can easily make out that Dreamhost is the cheapest option for 1 year when you take into account Hosting + Domain Name + Domain Privacy. It also offers you to host unlimited websites as against 1 website for Bluehost.
It is also a better-rated hosting provider and hence a better choice to start your blog.
Step 5: Purchasing A Web Hosting And Setting Up Your WordPress Blog
Buying web hosting from Dreamhost is very straightforward. However, I am going to walk you through the process so that you know what options to select during the checkout process.
1. Visit the Dreamhost website by clicking the button below
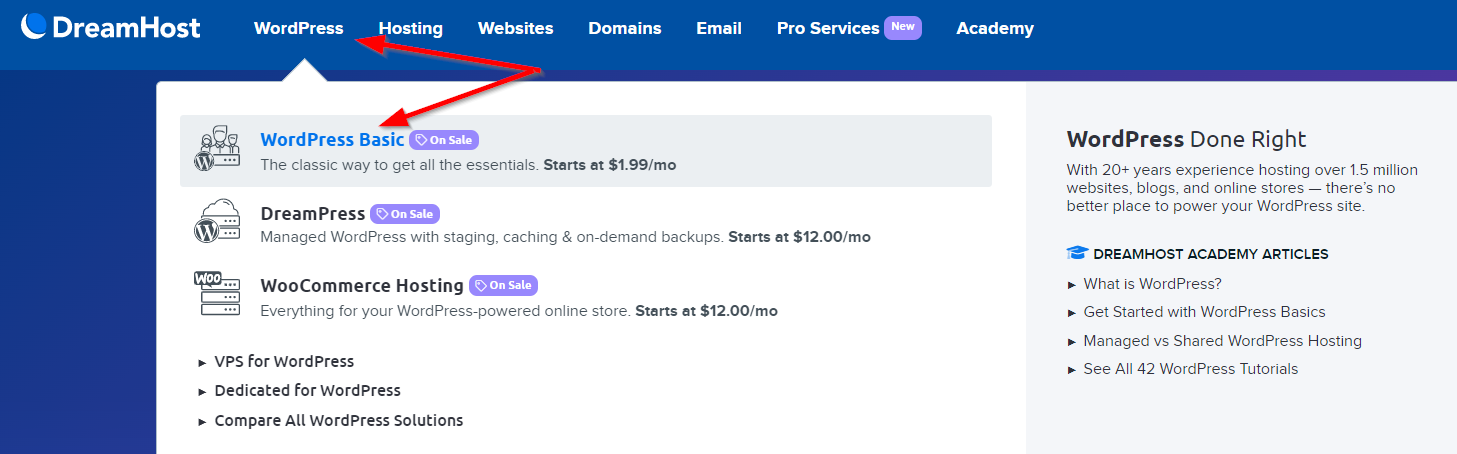
2. On the page that opens, hover over the WordPress option in the Top Menu and then select WordPress Basic. You can refer to the screenshot below

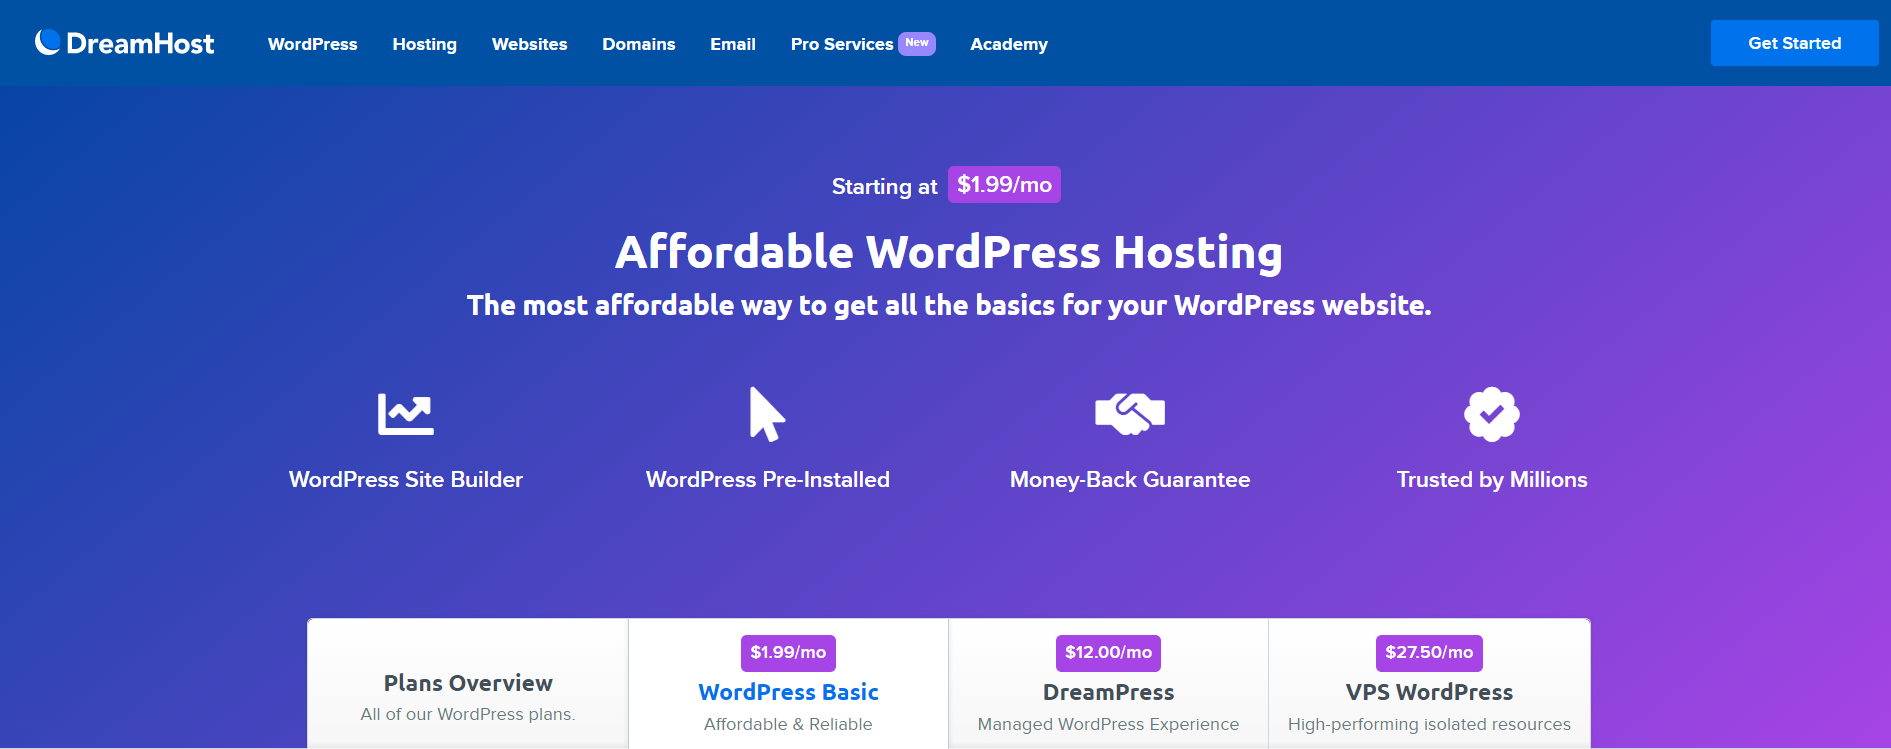
3. Next, you will see the below page.

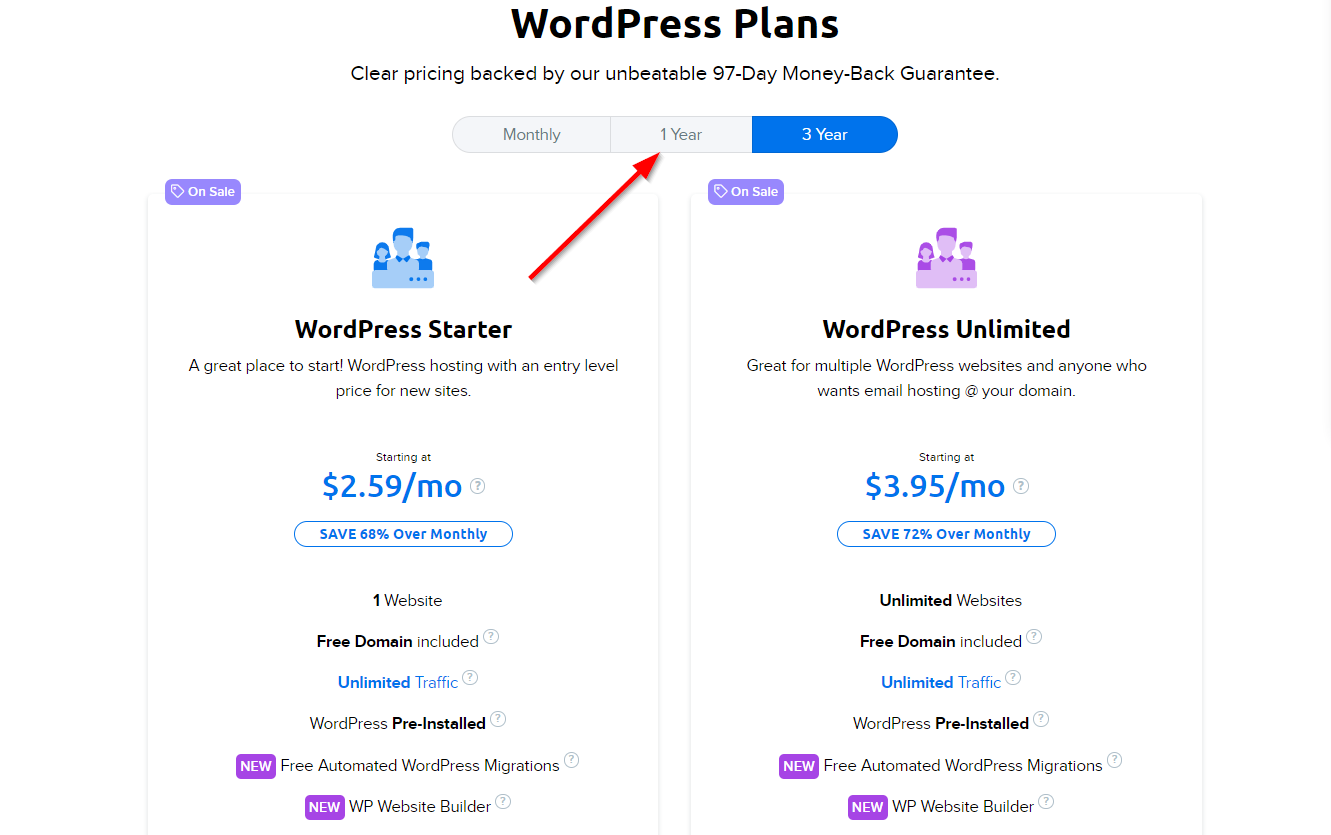
4. Scrolling down will reveal the two Dreamhost WordPress Basic plans. Switch to the 1-year pricing tab as shown in the image below

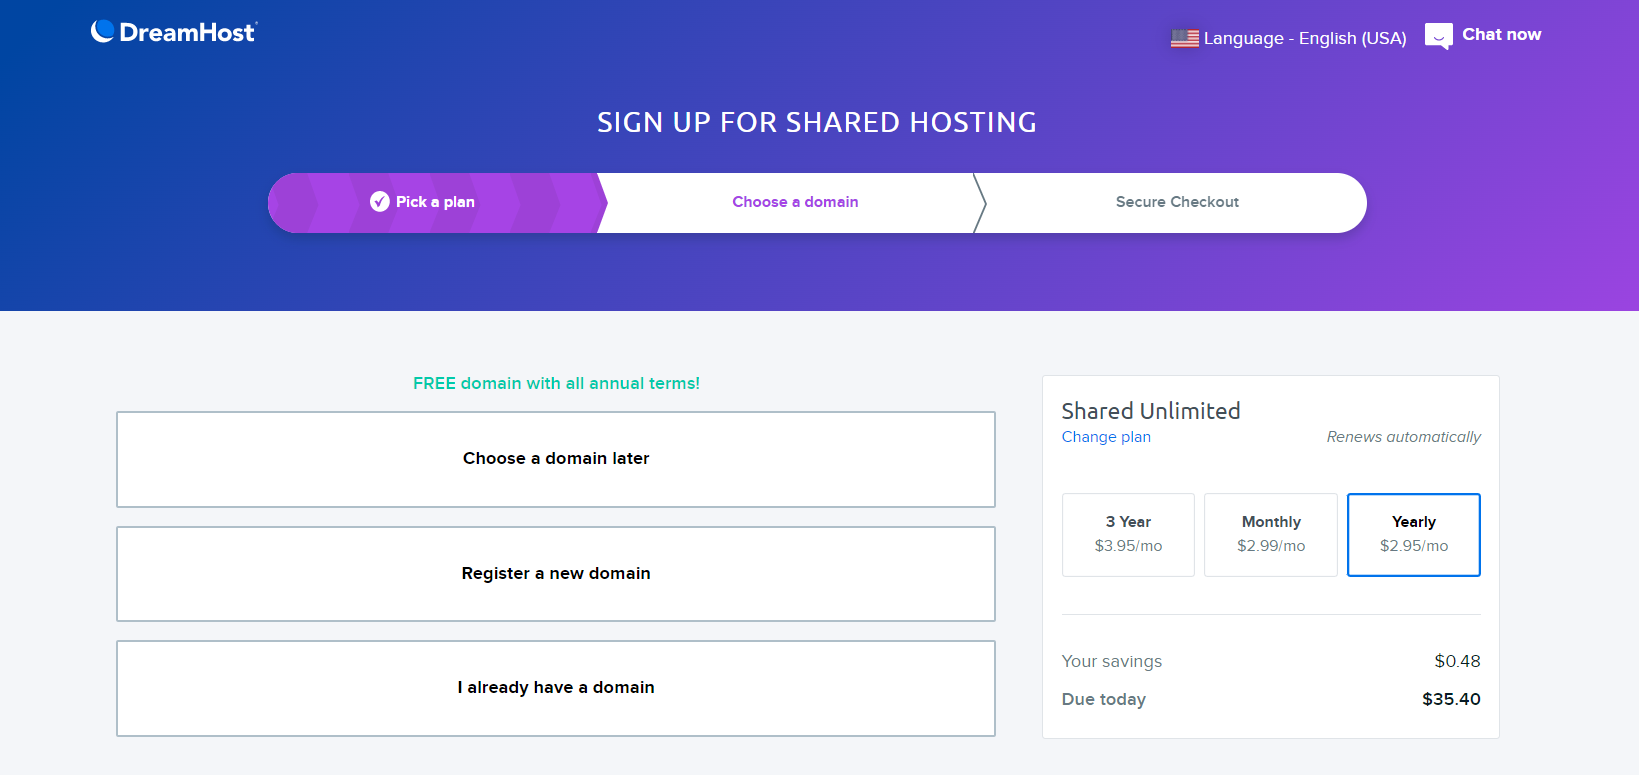
5. You will now see the pricing for one year of hosting as shown in the image below. Click the Signup Now option below the WordPress Unlimited Plan.

6. You can now see the below page where you can find three options, Choose A Domain Later, Register A New Domain and I Already Have A Domain. Choose the Register A New Domain Option.

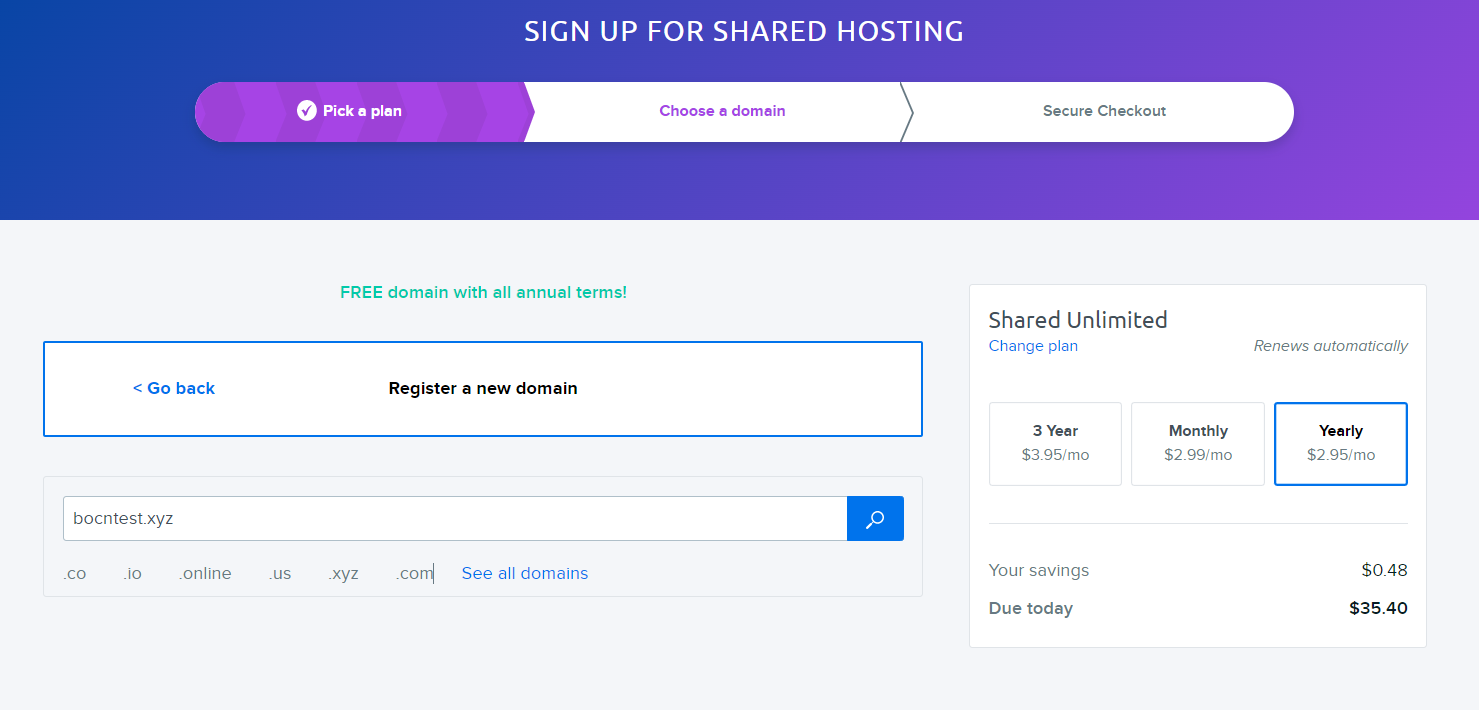
7. You can now type a domain name of your choice in the search bar as shown in the image below.
Remember, only selective domain extensions are available for free. This, however, includes most of the common domain extensions including .com, .co, .me, .net, .biz, .org, and more.
Once you enter the domain name, press the enter search bar or press enter and Dreamhost will check if the domain name is available or not.

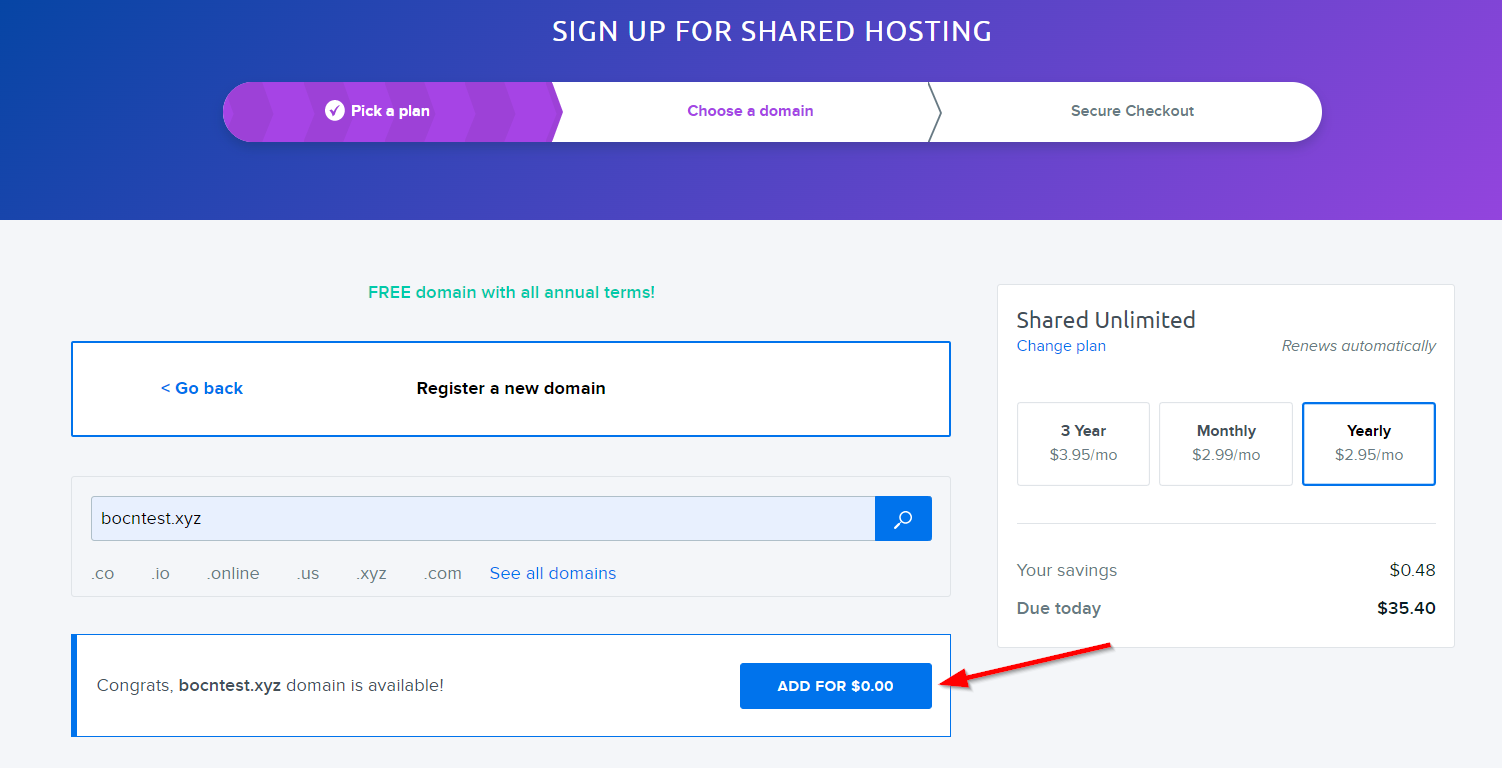
8. If the domain name is available, you will see a message that your Domain is available and an option to add the domain to the cart for free as shown in the image below. If your domain name is unavailable, you can try a different domain name or choose a different domain extension.

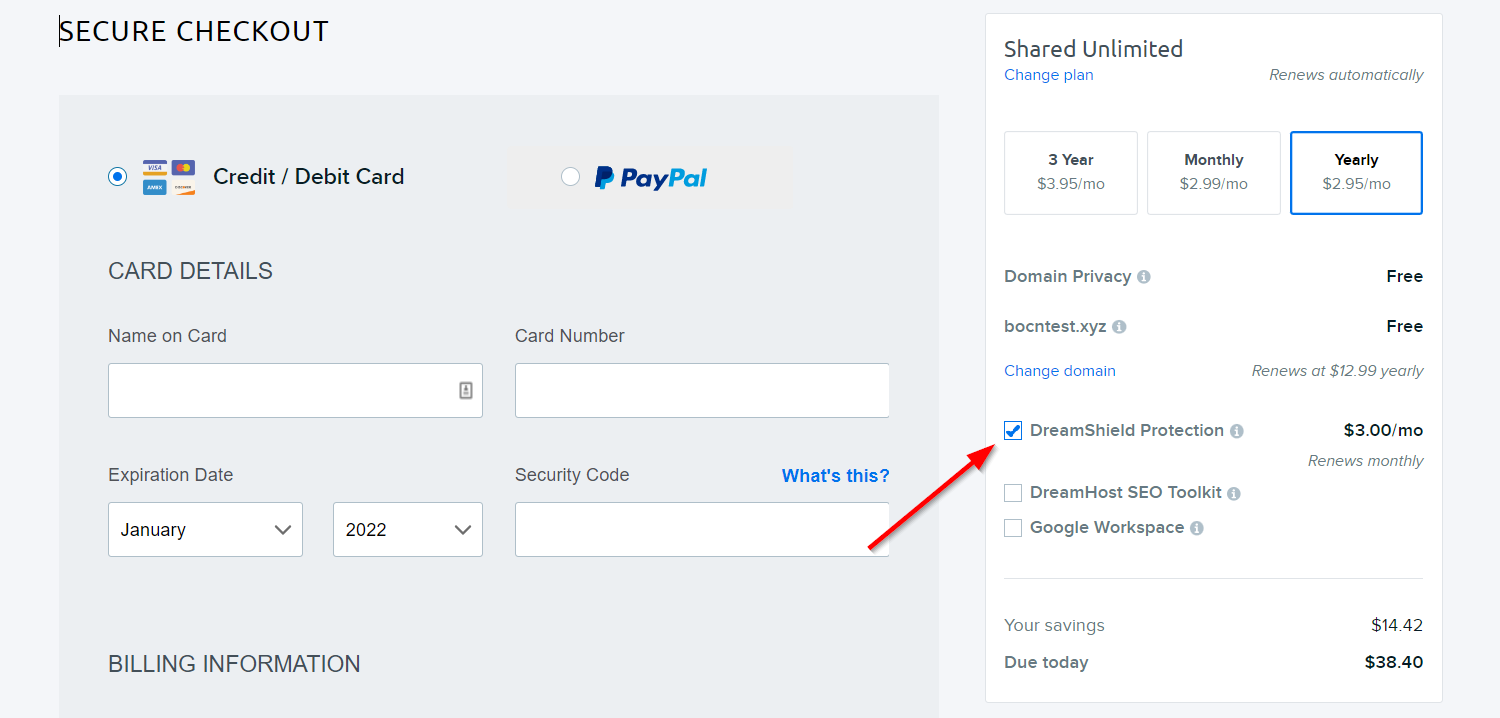
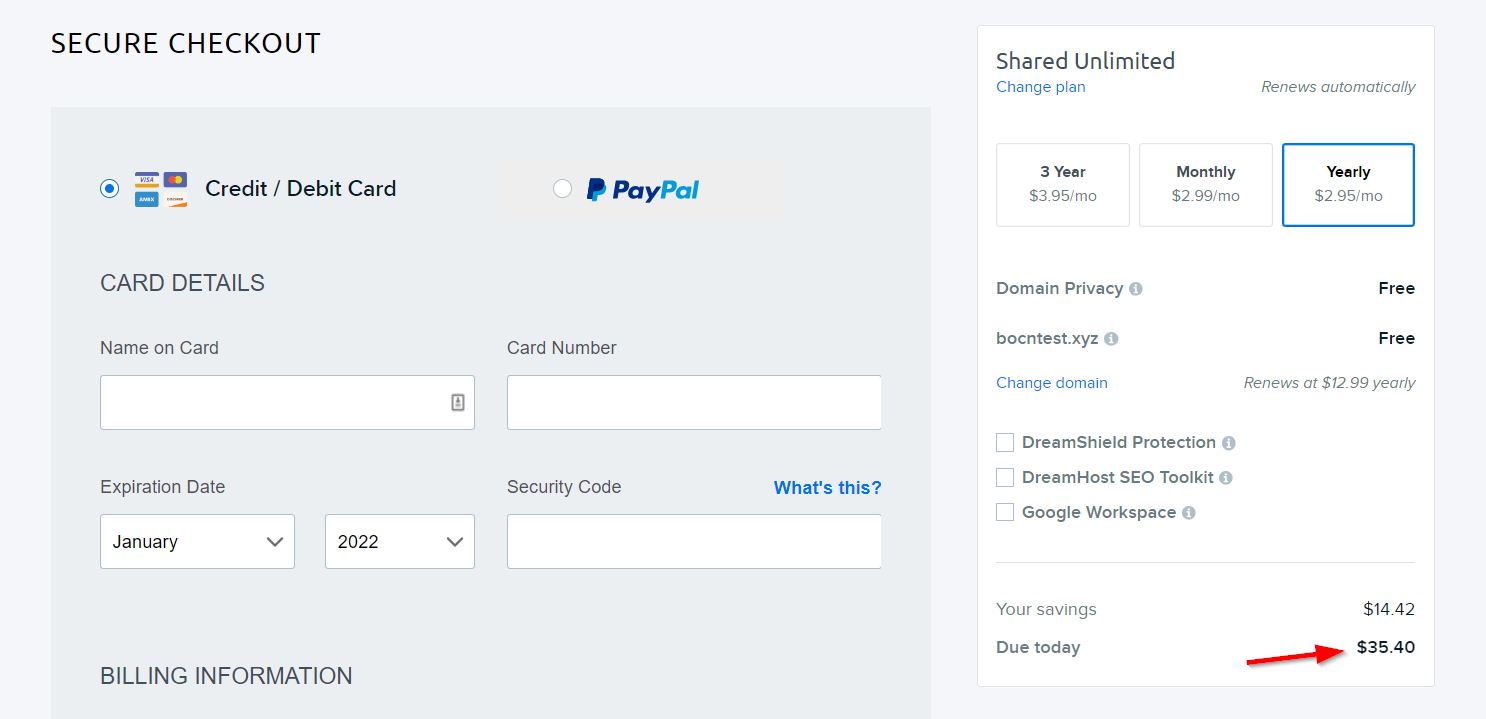
9. Once you add the domain to the cart you will now see the updated cart. As shown in the image below, uncheck the DreamShield Protection option

9. You will now see the updated pricing of $35.4 with a Free Domain Name and Free Domain Privacy

9. Now complete the checkout process by adding your personal and billing details and completing the purchase. Upon completion of the purchase, you will be redirected to the Dreamhost Dashboard as shown in the image below

Install WordPress On Web Hosting Server
Dreamhost comes with WordPress Pre-installed. However, just in case WordPress is not installed, you can follow the below steps to install WordPress
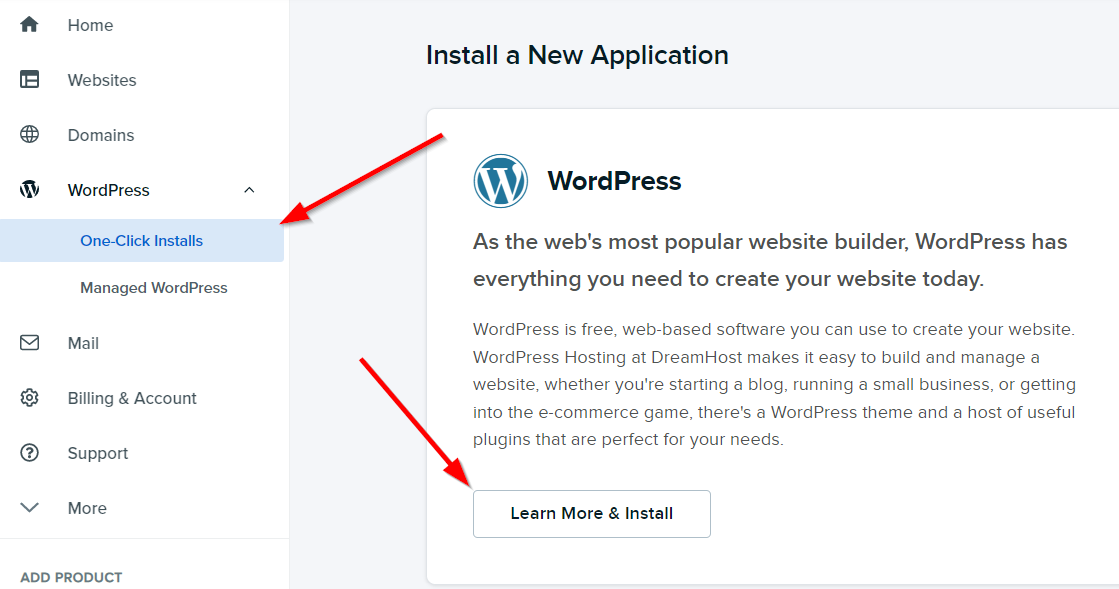
1. On the left-hand side menu, select the WordPress option and then the One-Click Installs option as shown in the image below. Next, click on the Learn More & Install option

2. You will now see the below screen with an option to install WordPress.
In the box beside Install To option, select your domain name from the dropdown menu. Make sure the box on the right-hand side of your domain name is blank. Uncheck the option Install WP Website Builder and click on the Install It For Me Now button.

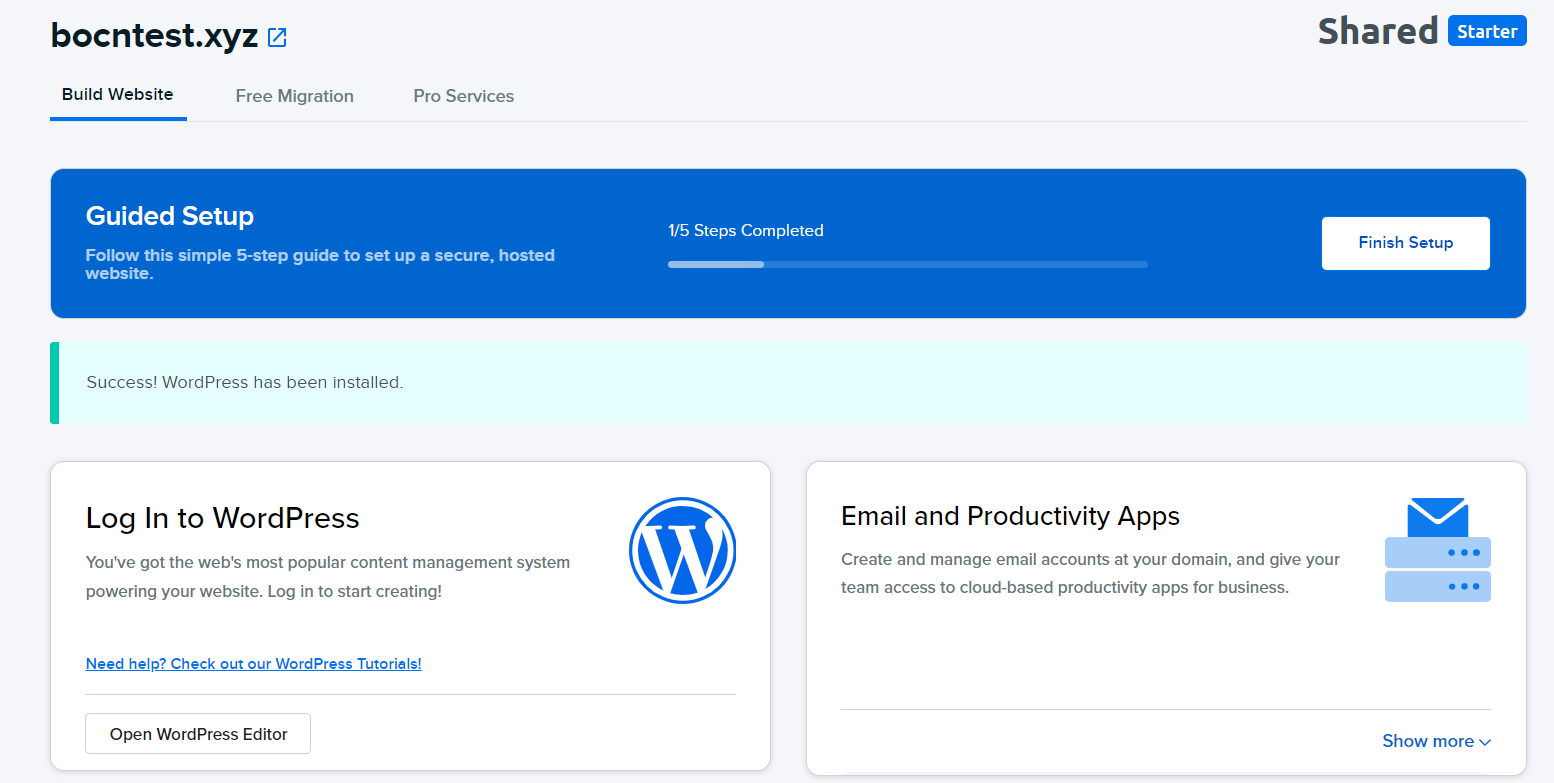
3. You will now see the below success message. Your WordPress installation is now in progress and should ideally be completed in under a minute.

4. You can track the installation progress by navigating to the Home option in the left-hand menu. This will look like something in the image below

5. Once the installation is complete, you will see the success message. You can click on the Open WordPress Editor to open the WordPress Dashboard without a username and password. Alternatively, you will also get an email from Dreamhost with your WordPress Username and an option to set the password.
However, I recommend using the Open WordPress Editor option as we will anyway delete the automatically created username after creating a custom username.

But before we talk about the WordPress Editor, we will have to check the status of our SSL Certificate
Step 6: Check SSL Certificate Status
SSL certificates are used to secure your website data transfer from your server to your user's computer from hackers. Without SSL, your website will use the HTTP:// protocol instead of HTTPS://, and your visitor's browser will show a Not Secure warning.
Luckily, Dreamhost automatically installs an SSL certificate for you. However, the installation of an SSL certificate can take up to 30 minutes. You can check the status of SSL installation by navigating to Websites > Secure Certificates as shown in the image below
If your certificate is installed, you will see Let's Encrypt in the Certificate section. If it's still processing the certificate you will see the same under the certificate section.

Step 7: Understanding Your WordPress Dashboard
While you can easily log in to your WordPress Dashboard using the Open WordPress Editor button in your Dreamhost Dashboard, it is also important to know how you can manually log in to your WordPress Dashboard with your Username and Password.
Logging in to your WordPress is easy as pie. Just head over to the below URL after replacing yourdomain.com with your domain name
https://www.yourdomain.com/wp-admin/
Once you enter the URL, you would be redirected to the WordPress login page where you can enter the Username and Password. Remember you can always use the email sent by Dreamhost with your username and option to reset your password to get your Username and Password for logging in.
At this point, you can straightaway write your first blog post. But before you go ahead, you must know how to customize your blog look using WordPress Themes and add more functions to it using WordPress Plugins.
So, let us first understand your WordPress Dashboard.

#1 Updates
This is where you can update your WordPress Core Installation, WordPress Themes as well as WordPress Plugins
#2 Posts
The Posts section allows you to manage your Blog posts. For a blogger, your posts are the backbone of your content. Hovering over the Posts option or clicking on it will reveal more options.
This section allows you to add new blog posts as well as view and edit the existing blog post. You can also manage your Blog Post categories and tags from here.
#3 Media
This is where you can upload your images or view images that you have uploaded.
#4 Pages
This section allows you to add, view, and edit the static pages of your WordPress Website.
#5 Comments
Comments are the opinions people leave on your blog post. This section allows you to manage your comments including Approving comments, replying to them as well as editing and deleting them.
#6 Appearance
As the name suggests, this section allows you to completely manage the appearance of your blog. This includes managing your Theme and customizing it. This section also features a theme editor for people who want to modify the code of the theme.
The appearance section also allows you to add and manage your Blog's Menu items from here. WordPress Widgets can also be managed from this section. Widgets are content areas that can be added to the sidebars and footer.
#7 Plugins
Plugins are used to enhance the functionality of WordPress. In this section, you can add new plugins as well as view and delete existing plugins. This section also features a plugin editor for people who want to edit the codes of plugins.
#8 Users
As the name suggests, this section allows you to add and delete users. You can also change your email, Name, as well as a few other details in this section.
#9 Tools
This section allows you to import or export your blog posts through XML files. You can also export or erase your personal data apart from checking the health of your blog.
#10 Settings
You can change your blog's settings in this section. Some of the settings in this section are critical to your blog and hence we will check the same in the next section.
#11 New Shortcut In Toolbar
The New option in the WordPress Toolbar acts as a shortcut to add a new Post, Page, Media, or User.
#12 At A Glance Section
As the name suggests, the At A Glance Section is used to check your number of posts, pages, and comments. It also displays your WordPress version and WordPress Theme.
#13 Activity Section
The Activity section allows you to quickly check the recent activities on your blog.
Step 8: Settings And Optimizations
Step 8: Settings And Optimizations
Below are some settings I highly recommend before you start writing your blog posts. Let me walk you through each one of them.
a. Changing WordPress General Setting
To change the general settings, navigate to Settings > General on the left side menu. You will see several options as shown in the image below.

Below are some changes that you need to make.
Uncheck the Anyone Can Register option
Select your Site Language (Default is English)
Select Your Timezone (Default is GMT)
Select Your Date Format
Select Your Time Format
b. Changing WordPress Reading Settings
To change the reading settings, navigate to Settings > Reading.
The first option allows you to use either your blog page as your home page or allows you to create a custom static page as your home page. If you are unsure, you can keep the option as it is to display your latest posts on your homepage.
For the other options, you can select the values as shown in the image below.

Important Note
In the Reading Settings, make sure the option Search Engine Visibility is Unchecked. If you check that box, Google and other search engines may not index your website.
c. WordPress Discussions Settings
You can keep the WordPress Discussion settings exactly as shown in the image below.

c. Changing WordPress Default Permalink
By default, WordPress uses a permalink structure with a date in it. The default URL looks like below.
https://www.example.com/2023/07/20/sample-post/
However, unless you are creating a news website, this URL is not recommended.
To change the permalink structure navigate to Settings > Permalinks. You can either select one of the suggested options or create a custom permalink structure. I highly recommend selecting the Post Name option.

d. Removing Unnecessary Data
By default, WordPress adds a Post Titled Hello World, a page titled Sample Page, and a Hello Dolly plugin that you need to remove.
To remove the sample post first navigate to the post section by clicking on the posts option in the left sidebar menu of your WordPress Dashboard.
Next, hover the mouse pointer over the title of the post you want to delete. As shown below, this will reveal a few options below the post title. Select the Trash option to delete the post

Likewise, you can delete the Sample Page and Hello Dolly Plugin by going to the Pages and Plugins options respectively.
Step 9: Customize Blog Design With Themes
WordPress comes pre-installed with a theme. However, most WordPress users prefer to customize the look of their blog to their liking. So, if you too don't like the default WordPress Theme, you can easily pick a new WordPress Theme from thousands of free themes available in the WordPress Repository.
To find a new theme for your blog, you can navigate to the Appearance > Themes option on the left-side menu as shown below in the image below.

On the page that opens, click on Add new.

You will now be able to see thousands of WordPress Themes. As of July 2023, there are a whopping 10,900+ themes available for you to pick for free.
As shown below, to install a theme you just need to hover your mouse over the theme you want to install and click on the Install button. The WordPress theme will be installed in a few seconds.
Once installed, the Install button will be replaced by the Activate button. Click on it to activate the theme.

You can also click on the Preview button to see how the theme looks on your blog before installing and activating it on your blog.
Alternatively, on the Add Themes page, you will also find an option to upload a theme. This option can be used if you downloaded a theme from WordPress Repository or bought a paid theme from elsewhere.
To upload a theme, on the Add Themes page click on the Upload Theme option at the top.

Next, click on the Choose File option to find the correct Zip file on your computer and click on the Install Now button. Once installed you will see the Activate button which you can click to activate the theme.

Step 10: Install WordPress Plugins
Though WordPress is feature-rich right out of the box, it lacks several features. This might be partly because there is nothing like one-size-fits-all with the website. And it doesn't make sense to add too many features one might never use which may slow down your website.
There's where WordPress Plugins come into the picture. There are more than 50,000 free WordPress plugins available in the WordPress Plugin Repository to add several features that vanilla WordPress lacks.
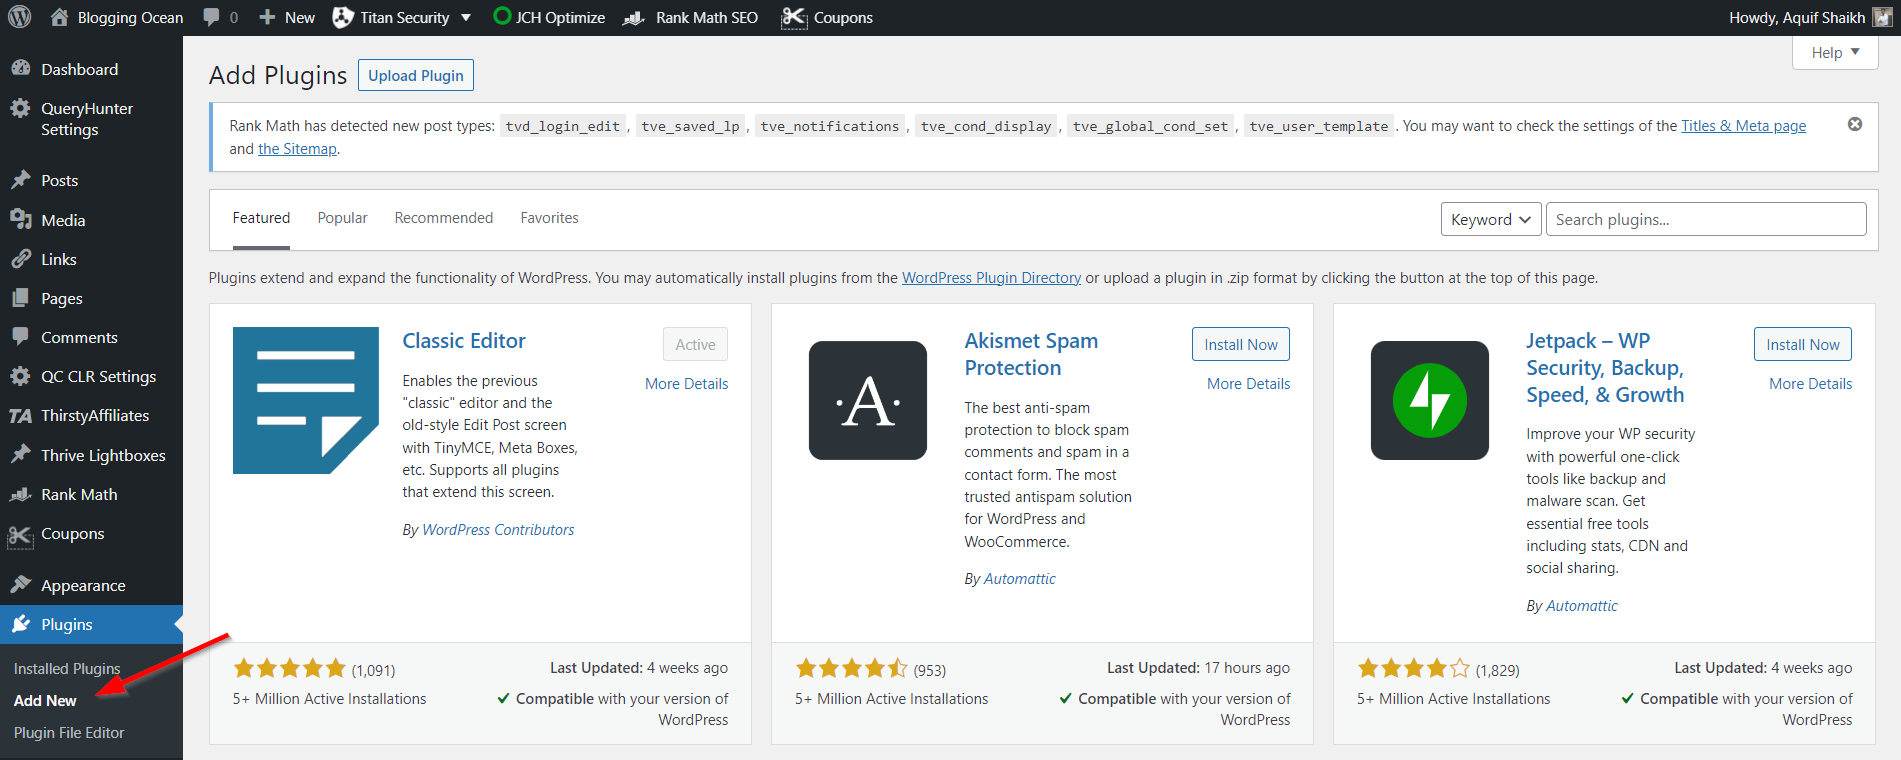
To add a plugin, you can hover over the Plugins option in the left-side menu of the WordPress Dashboard and click on Add New.
You can use the search bar to search the plugins or you can simply browse them. To install the plugin, click on the Install Now button.
You can use the search bar to search the plugins or you can simply browse them. To install the plugin, click on the Install Now button.

Once the plugin is installed, the Install Now button will be replaced with Activate button. Click on it to activate the button.
Similar to WordPress themes, plugins can also be uploaded and activated.
Below are some of the recommended free and paid Plugins
1. Akismet: Akismet prevents spammers from leaving spam comments on your blog. This plugin is free for personal use.
2. Classic Editor: You can install this free plugin if you prefer the Microsoft Word like interface over the Gutenberg Editor (More on Gutenberg in the next section)
3. Thrive Architect: This post is designed using Thrive Architect
4. Starter Templates: Get readymade websites built with Elementor and WordPress Gutenberg editor for free.
5. GA Google Analytics: A freemium (Free with Premium Plans) plugin to easily install Google Analytics code on your website. (Learn how to set up Google Analytics Account here)
6. Rank Math SEO: A free plugin with optional premium plans that allows you to easily optimize your blog posts for SEO
7. Thirsty Affiliates: A freemium plugin to cloak and easily manage your affiliate links
8. WP Rocket: A paid plugin that helps you to speed up your WordPress website.
Step 11: Get Full Fledged Website In 3 Minutes
Designing a WordPress website from scratch can be a pain especially if you aren't a creative person. Luckily, there is a plugin by Astra Themes that allows you to install beautiful WordPress Blogs built with Elementor as well as Gutenberg Builder in just 3 minutes.
The plugin offers several free templates. However, you can unlock the pro templates along with the Astra theme for just $137/year. With the paid plan, you will also get access to premium support from Astra Themes.
So, let's go ahead and see how you can use the Starter Templates to design a beautiful WordPress blog.
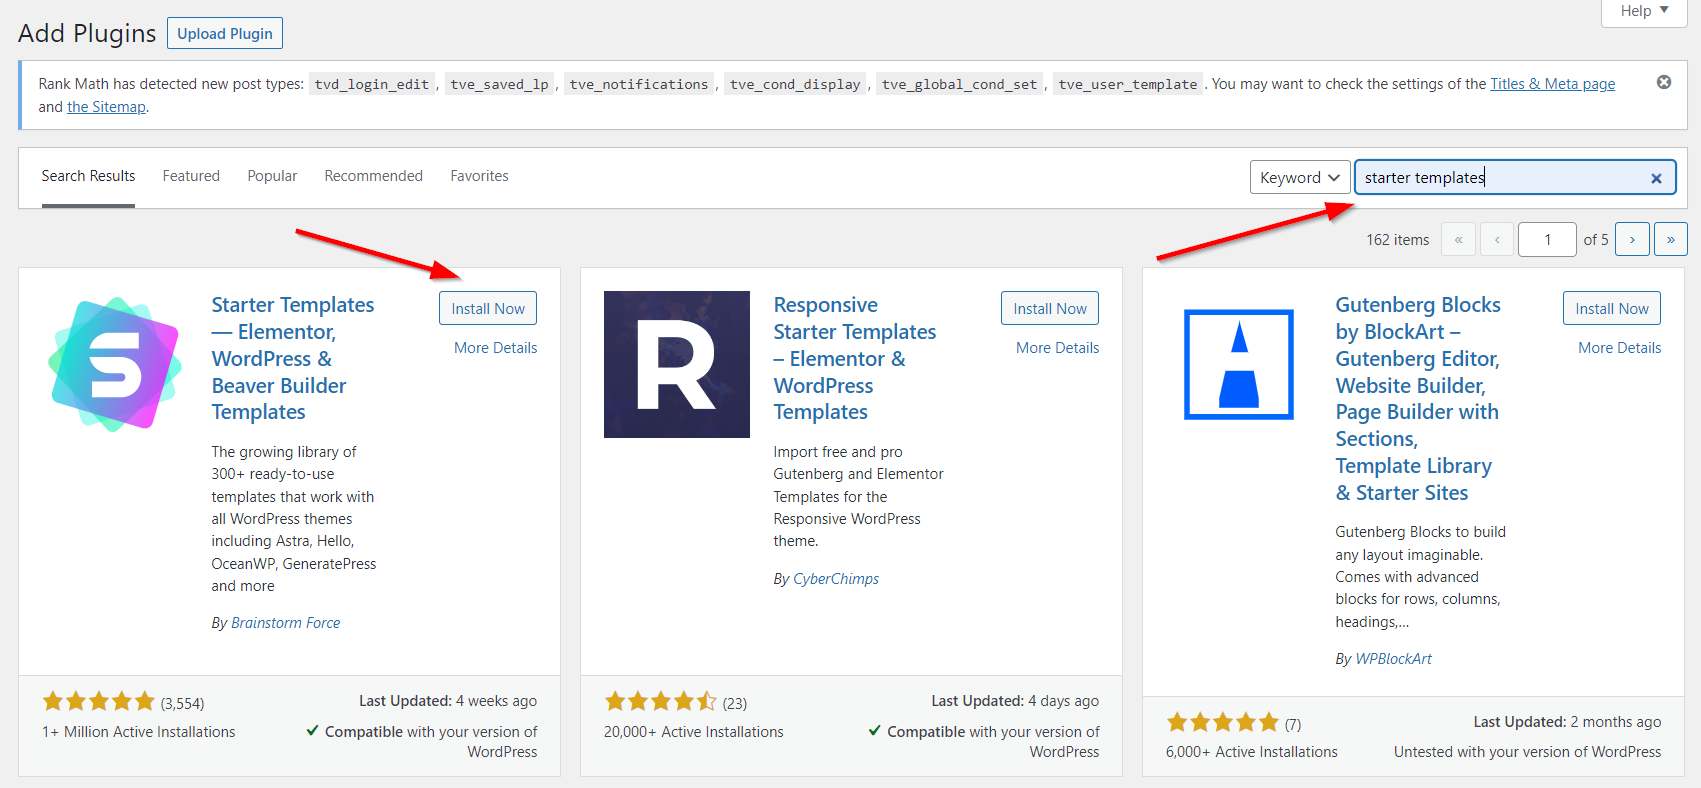
First, go to the WordPress Plugins Repository by navigating to Plugins > Add New as discussed earlier.

Next, search for Starter Templates in the search box on the top right side, and on the page that opens click the Install Button in front of Starter Templates — Elementor, WordPress & Beaver Builder Templates plugin as shown in the image below

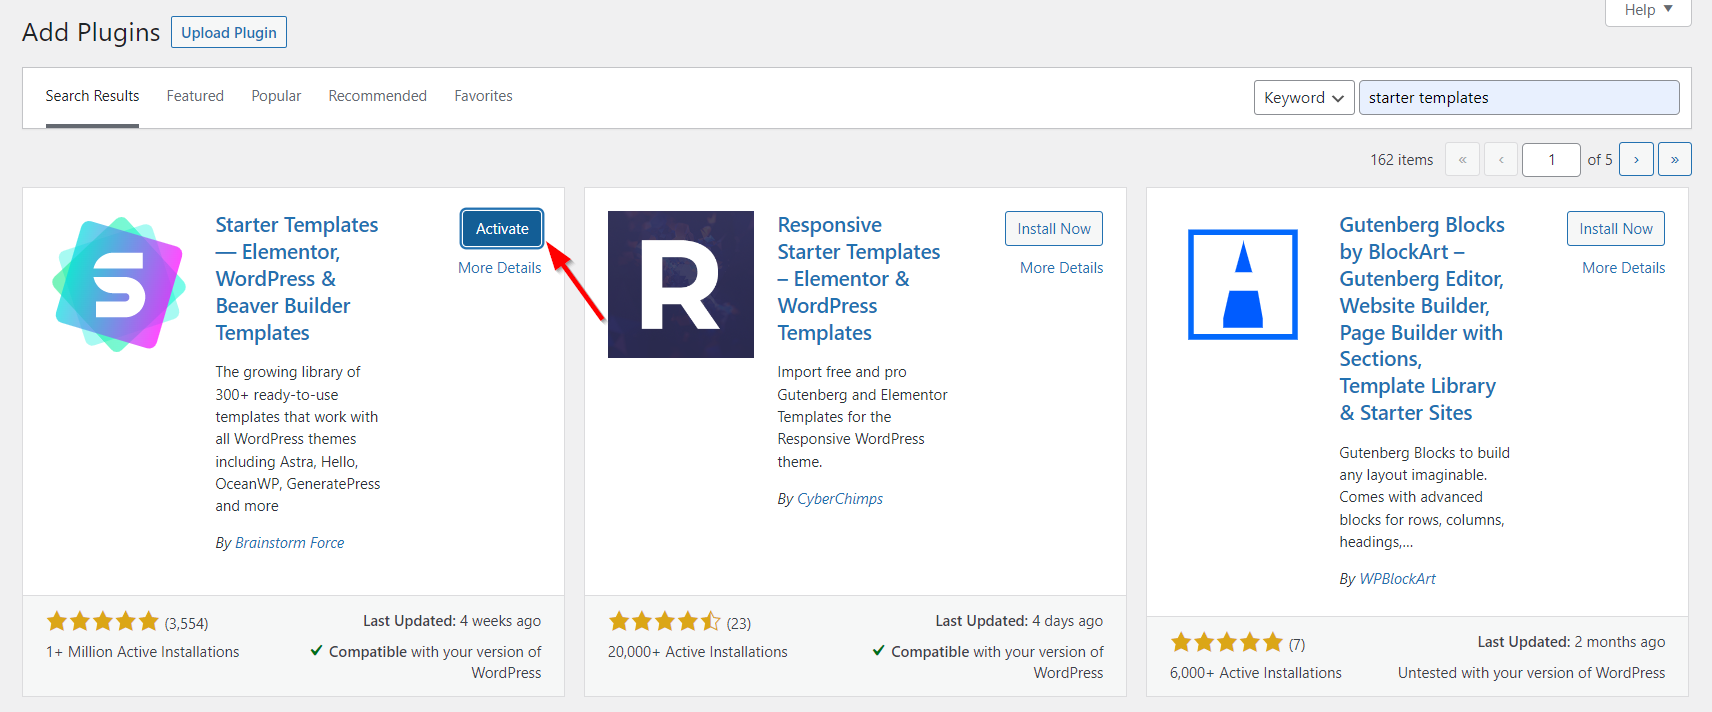
This will start the installation of the plugin. Once the installation is complete, you will see the Activate button. Click on it to activate the plugin as shown in the screenshot below

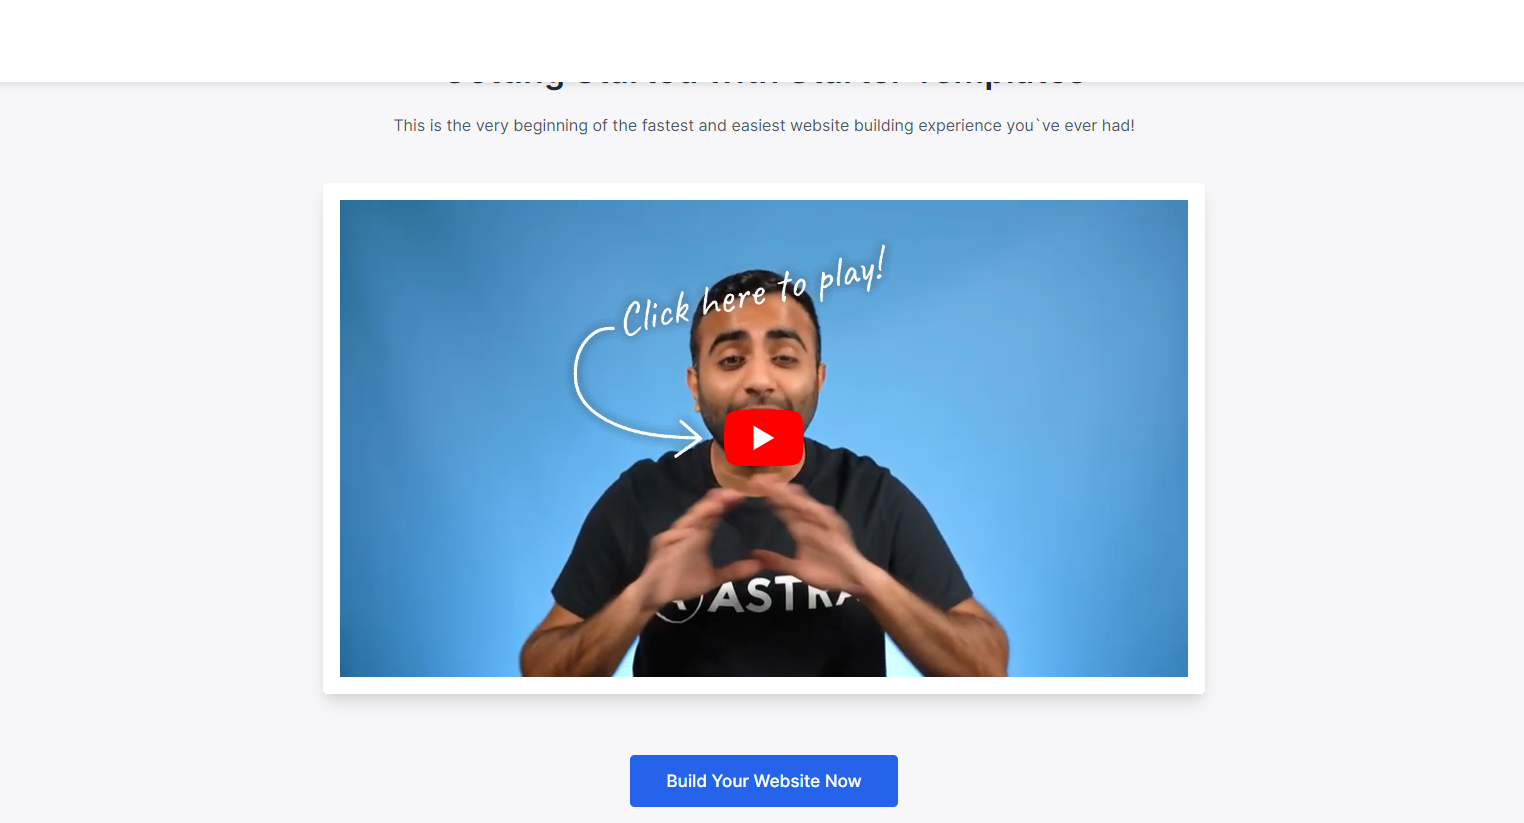
Once the activation is complete, you will be taken to the WordPress Plugins page below where you can see the Starter Templates plugin installed. As shown in the screenshot below click on the See Library option.

You will now see the below option. Click on the Build Your Website Now option as shown below

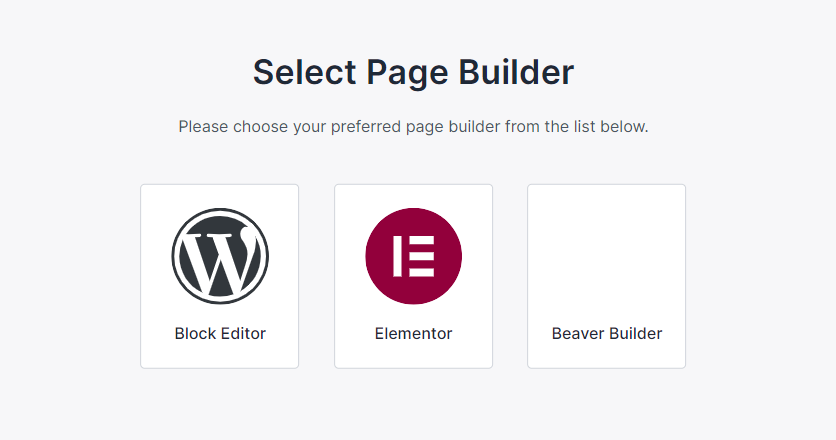
Next, you will be asked to select the Page Builder for building the website. I recommend selecting the Gutenberg Option if you want a simple but fast website. But if you don't mind a slightly slower website in exchange for fancy features, select the Elementor option

For our example, I will be selecting the Elementor option. Next, you will see a huge list of templates classified under different categories as shown below.

Click on the template you like. It will open up a page similar to below where you can customize your logo. To skip you can click on Skip And Continue
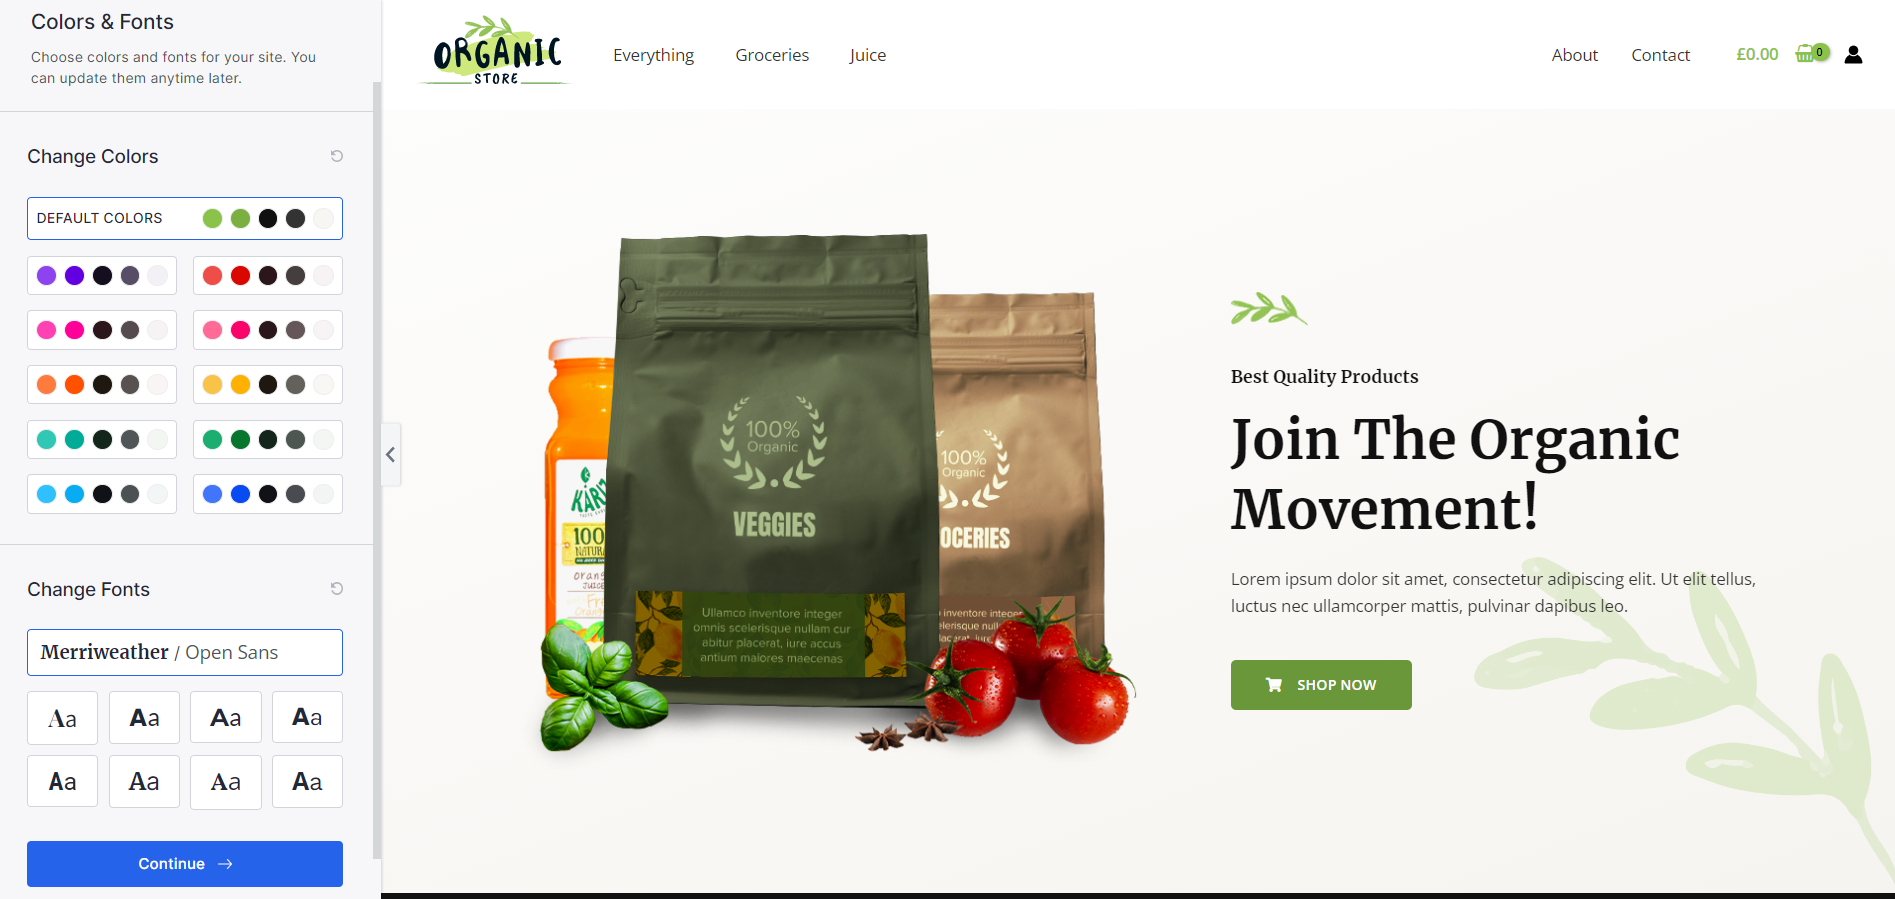
Next, select the fonts and color schemes and click on Continue

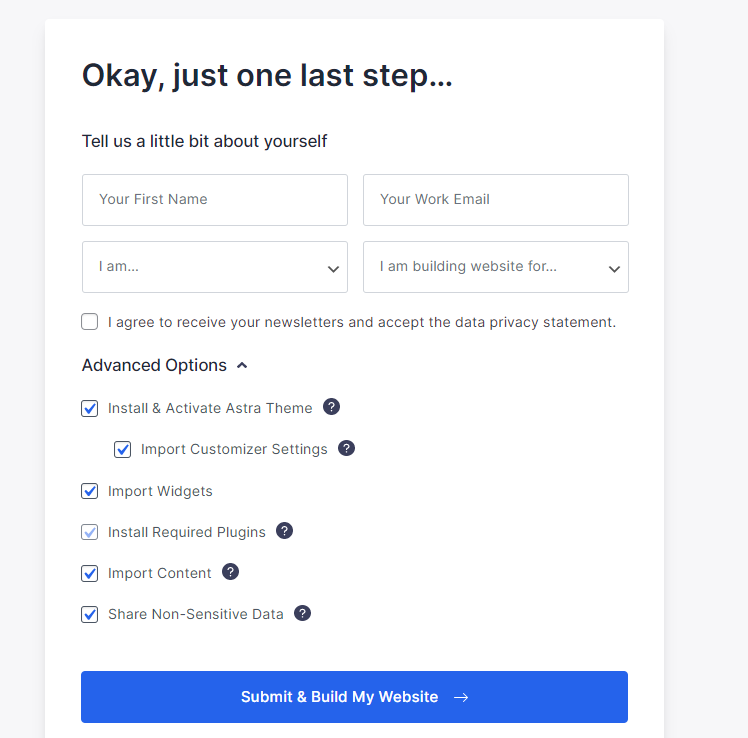
Lastly, you will be asked for your personal details. Don't worry, I have been using this plugin for a long time and unless you check the Newsletter checkbox, you won't get a single email from them.
Keep the Advanced options as it is and click on Submit & Build My Website

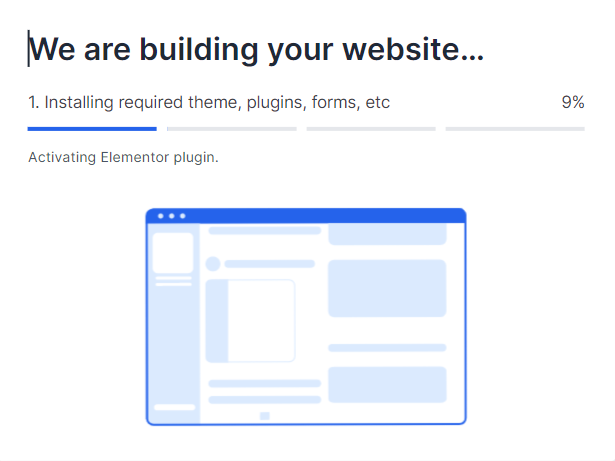
Next, the plugin will install all the necessary themes and plugins for the demo website. You can see the progress.

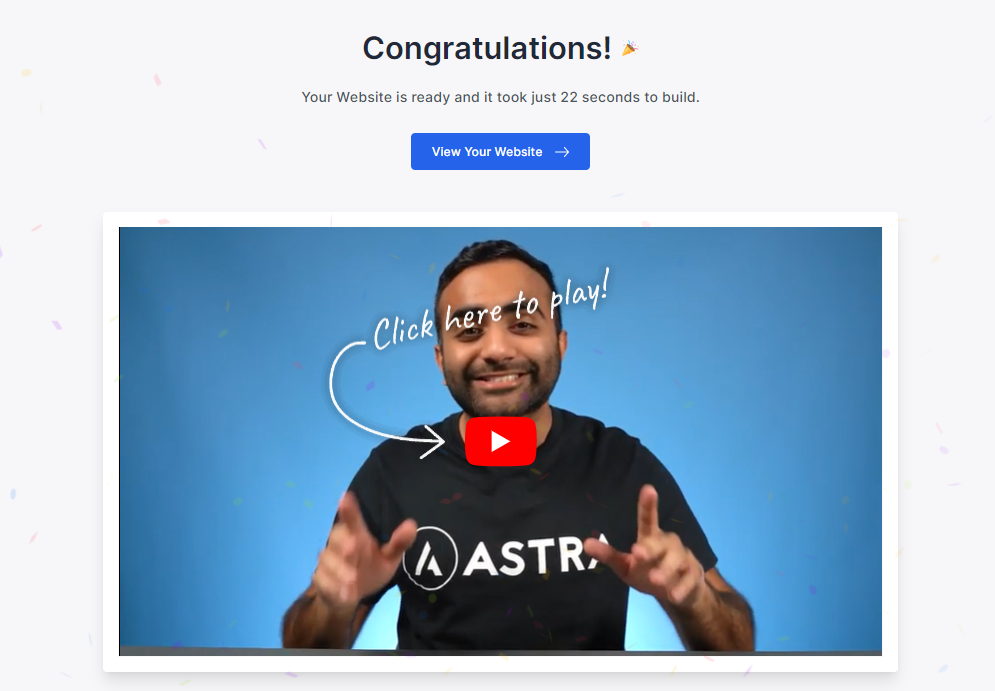
Once done, you will see the success message along with the time it took to build the website. I chose to build an e-commerce website which took just 22 seconds. Isn't that great?

You can now check your website by opening your domain name or check the backend of the website by visiting https://yourdomain.com/
You can also edit the looks as well as the content of your website using either the Gutenberg or Elementor page builder, whatever you chose earlier.
Step 12: Creating Pages And Posts
Before you create your first post it is necessary to understand the difference between WordPress Post and WordPress Pages.
Posts: WordPress Posts are web pages where you share your thoughts and articles. It contains a date and is displayed in reverse chronological order to make sure the latest content is seen at the top
Pages: WordPress pages usually do not contain a date and are used to display static content of your website that does not change often with time. For example, your blog's About Us Page or Privacy Policy Or Disclaimer are examples of WordPress pages.
How To Create A Post
Now that you know the difference between a post and a page, let us understand how you can create the post. The process will be similar for creating pages
To create a post, you can either Navigate to Posts > Add New option in the sidebar or in the Toolbar above Navigate to New > Post

WordPress will, by default, open the article with its in-built drag-and-drop editor called, Gutenberg as shown below. There might be a learning curve using this editor as it is not user-friendly.

The Gutenberg editor uses drag-and-drop Blocks to add several elements that you see on a website including paragraphs of text, headlines, images, tables, media, and more.
The default Block is Paragraph, so you can straightaway start typing your blog post like in the classic editor. To change the fonts and change other settings of the paragraph just select the paragraph block you want to edit and then use the right-hand side bar options as shown below

To add Media, Tables, or other elements, you can type the forward slash (/) and then find the Block from the drop-down menu.

Alternatively, you can also click the plus (+) sign to reveal all the Blocks on the left side of the editor

To Delete a Gutenberg Block simply select the Block and then click on the three dots as shown in the image below to reveal the Remove the Block option. Click on it to delete the Block.

To Publish a post you can click on Publish button as shown in the image below. Also, to reveal more options like scheduling posts or changing permalinks click on the Post option as shown in the image below.

If you don't like the drag-and-drop interface of Gutenberg you can install Classic Editor Plugin as recommended in the plugin section to revert to TinyMCE editor which is an MS Word like blog post editor as shown below.

Since the TinyMCE editor is straightforward and very much similar to Microsoft Word, I won't be covering it in detail. However, to save the post you can use the Save Draft option, and to publish the post you can use the Publish option as shown in the image above
How To Create A Page
You can create a page by navigating to Pages > Add New on the left side menu of your WordPress Dashboard. The other steps remain exactly the same.
Important Pages You Must Create
Below are some of the important pages that you must create on your WordPress Blog
1. About Us Page
The About Us page gives readers an insight into who you are, what your blog is about, and why they should stick around. Your About Us page should include a brief overview of the purpose of your blog, a little information about who’s behind it, and how to contact you.
2. Contact Page
Your Contact page should provide readers with a way to get in touch with you. Include an email address, social media links, or a contact form.
3. Home Page
Your Home page should be designed to draw visitors into the rest of your blog. It should feature your most popular content, give readers a glimpse of who you are and what your blog is about, and provide easy access to other important pages on your blog.
4. Privacy Policy Page
Your Privacy Policy page should outline how you use the information that visitors provide when they interact with your blog. It should also explain what third-party services you may be using (e.g., social media, analytics tools, etc.) and how those services treat visitor data.
5. Disclaimer Page
Your Disclaimer page should outline any disclaimers or legal information related to your blog. For instance, if you’re reviewing products on your blog and receive compensation for doing so, this should be explained on the Disclaimer page.
6. Affiliate Disclosure Page
If you’re using affiliate links on your blog, then it’s important to include an Affiliate Disclosure page. This will let readers know that you may earn a commission for any purchases they make through the links on your blog.
Step 12: Driving Traffic To Your Blog
To be able to make money from your blog, you must first drive people to your blog. Below are several popular techniques used to drive traffic to your blog.
a. Create The BEST Content
Imagine you are trying to sell a book that has a pathetic storyline and is full of grammatical errors. Even if you hire the best marketers to promote your book, the book will be a big flop.
The same thing applies to your blog. If the quality of your content is not good, no matter how hard you try, you won't find many people visiting your blog. Needless to say, to be able to make money with your blog, you need people to visit your blog and engage with your content.
I won't get into much detail about how you can write good content as I have already written a detailed article on it. So you can always check out the article on How To Write An Engaging Blog Post
b. Keyword Research
Keywords are nothing but queries that users search while finding information on Google and other search engines.
As a blogger, your aim should be to rank for Keywords that people are actively searching for. And to do so, you need to include the commonly searched keywords in your blog post.
So, if you are writing an article on How To Reduce Weight, your keyword should either be How To Reduce Weight or Tips For Weight Loss.
Of course, you can use multiple keywords on your web page so long as they are used naturally and not just there to get traffic to your page. The latter is a Black Hat SEO technique and can get your website penalized.
c. Optimize Your Web Pages
Once you have done your keyword research, it's time to optimize your web pages for them. This includes optimizing the SEO Title, Blog Page Title, Headings (H1, H2, H3, etc.), and Content of your blog post.
These elements should include the keywords that you want to target so that the search engine can understand what your page is about and rank it accordingly.
You can use free plugins like Rank Math to optimize your page for Keywords. While most of the suggestions provided by Rank Math are spot on, you can, and should ignore the Keyword density recommendation as Keyword Density is no longer a ranking factor.
d. Build Backlinks To Your Website
One of the most important factors when it comes to ranking is the number of high-quality backlinks pointing to your website.
Backlinks are incoming links from one web page to another. Google considers a backlink from an authoritative website as a vote for your website and thus helps you rank higher on Google.
So, if you want your website to rank higher on Google, you should start building backlinks from websites in your niche. You can do this by creating the most awesome content and then asking other bloggers in your niche to link back to your website as an informational source.
Of course, easy said than done. But, still, you have to keep trying to earn backlinks.
SEO is a very vast topic that isn't possible to cover in this blog post. To learn SEO you can check out the Free SEO Course by Moz
e. Leverage Social Media
For most people, Social Media is fun and a way to kill time. However, for bloggers, Social Media is another soldier of your content's army. There are several blogs that run solely on traffic from social media.
However, driving traffic through social media is not as easy as sharing your blog post on Twitter. You must work to build your followers through organic means. Followers who will engage with your content. Followers, who would want to read your content. And unlike most people think, it takes months, and in some cases years, to build a huge network of your followers.
So, you must start working from day one on building your followers on social media.
f. Drive Traffic From Quora And Reddit
What do you do if your new blog doesn't rank on Google and you are finding it difficult to leverage Social Media and Guest Blogging? The answer is simple, use Quora and Reddit.
Quora and Reddit are the two most underrated means of driving traffic to your blog. They are the best places to find your target audience who are keen on learning from you.
On Quora, all you need to do is find and answer the questions that are relevant to your blog post, and occasionally, and I am repeating it again, just occasionally share links to your blog post as an additional detailed source to get more information.
Things can get a bit complex with Reddit where you have to find the right subreddit that allows you to share your link. However, once you find the right place, it can drive loads of traffic to your website.
Step 13: Monetize Your Blog
For anyone looking to start a blog to make money from it, this is the most crucial step. There are various ways one can make money from a blog. However, it's important for you to know what monetization method works best for you.
So, let us go briefly go through each way of making money from your blog.
a. Affiliate Marketing
Affiliate Marketing is a form of Marketing wherein you promote a brand's products on your blog and place a link pointing to their website. The link placed is called Affiliate Link.
Whenever someone clicks on this affiliate link and makes a purchase, the brand gives you either a fixed amount as a commission or pays you a percentage of the total sale value.
Affiliate marketing is usually the best way to monetize your blog as you get better returns for your efforts.
Most of my blog's income comes from affiliate marketing. So no surprise there that it tops my list of various ways to monetize your blog.
Best Affiliate Marketplace
b. Use Ad Networks
Ad networks are companies that work as middlemen between publishers and advertisers. They provide publishers with the ability to display ads on their websites/blogs.
Most of these websites show contextual ads, which means that the ads are related to your blog topic/niche.
Publishers get paid either for every click or for impressions that these ads generate. Though you have no control over whether you want to get paid for clicks or impressions.
The amount earned depends on the kind of advertisements being served by ad networks and is also dependent on the niche or topic of your blog post/page. Google AdSense is probably the most popular among all ad networks.
However, I am not a big fan of Google AdSense or for that matter, any ad network. This is because you have limited control over the ads you see on your blog and it might result in reduced affiliate revenue.
For example, if you are promoting a Laptop from Amazon. For a $1000 laptop, your commission would be 5% of $1000 which is $50.
However, if you have ads on your blog, with contextual, your user might see a direct Ad from Amazon and if he clicks on it, you will probably get paid around 50 cents to $1 resulting in a huge revenue loss for you.
c. Sell Your Own Products
If you have your own products, then you can promote them on your blog. You can use the WooCommerce plugin to create an eCommerce store on your blog to showcase the products you are offering.
Of course, you can also collect payments from customers, generate invoices, set-up delivery charges, and schedule and do everything a full-fledged e-Commerce store can do.
d. Sell Your Services
If you have any digital skills like content creation, web designing, and development, SEO, or more, you can use your blog to generate leads for your business.
Blogs allow you to show your expertise in the field and so can be a great way to get high-ticket clients for your business.
You can even host your business Portfolio on the Home Page of your website. Now, whenever a client asks you for work samples, you can refer them to your work portfolio on your website.
e. Sell Your Courses
You can also create and sell courses to make good money from your blog. There are several WordPress plugins like LearnDash, teachable, and more that you can use to create beautiful courses and tests for your students.
You can even create a course on platforms like Udemy and then promote it on your blog.
f. Sponsored Posts
Sponsored posts are posts that you write for companies or brands in exchange for a fixed amount of money. These sponsored posts will provide the company/brand with some exposure and also bring you some extra cash.
FAQs About How To Start A Blog
Below are some of the frequently asked questions by people wanting to start a blog
What is a blog?
A blog (short for “weblog”) is an online platform where people write content and share their thoughts, opinions, and experiences. Blogs are typically updated regularly with new content, which can range from personal reflections to product reviews to opinion pieces on a particular topic.
Is It Still Worth It To Start A Blog In 2023?
Absolutely! Blogging is still relevant in 2023. New bloggers are still making good money in the field.
So, if you want to be a blogger. It's still not too late. Just make sure to spend time learning keyword research, keyword clusters, and SEO, in general.
What Should I Blog About?
This is the most important part of starting a blog. Before you start writing, you need to decide on a topic for your blog. Think about what interests you and what sort of content you would like to create. It also helps to research popular topics in your niche so that your posts can have more reach.
Can I Start A Free Blog?
Yes, you can definitely start a free blog. There are various platforms like WordPress.com and Blogger that allow you to create a blog for free.
However, I, or for that matter, any expert would advise you not to go with a free blog. And there are various reasons why experts don't recommend a free blog. Here are a few of them.
1. Free blogs are highly restrictive. Some of them aren't SEO friendly while others have restrictions on the monetization methods.
2. When you create a free blog, you don't own the blog. If you happen to violate their terms and conditions, they may delete your blog at their own will and all your content will be lost.
3. If you are looking for a completely free option, you will get to host your blog on a subdomain. For example yourblog.wordpress.com or medium.com/yourblog instead of yourblog.com.
4. Apart from the ugly format of the subdomains, people don't take subdomains seriously. In fact, Google barely ranks these free blogs. So it will be hard for you to make money with them.
How Much Do I Have To Invest To Start A Blog?
Starting a blog is quite cheap. You can start a blog with Dreamhost for just $35.4. The pricing includes the cost of web hosting, domain name as well as domain privacy.
However, if you really want to succeed with your blog, you will have to take it as a business and invest some money in designing your blog (Page Builders and Themes), investing in good SEO tools, and building quality backlinks.
Is It Hard To Become A Successful Blogger?
Blogging isn't hard but it is definitely not as easy as some blogging gurus make it seem like. It requires some patience, dedication, and effort.
You will have to write high-quality content regularly and promote your blog in order to get more traffic and make money from it. But if you're passionate about your topic and willing to learn the necessary skills such as research, SEO, keyword optimization, etc., then you can turn your blogging business into a profitable venture.
What Should I Blog About?
This is the most important part of starting a blog. You can't write about every random thing on your blog. You should rather choose a niche and write all the content around that niche.
To pick a profitable niche for your blog, I'd suggest you follow the below steps
Should I Buy Linux Hosting Or Windows Hosting?
This is the most common misconception people have. Because they are so accustomed to Windows computers, they think buying a Windows hosting should be a better option.
However, in the web development world, Windows hosting is usually only used for building .NET apps. So, if you are planning to start a WordPress blog, you should get yourself Linux Hosting.
Do I Have To Learn Coding For Blogging?
Absolutely not! Unless you are looking for some advanced-level customizations, you might never have to write a single line of code. Building websites with WordPress these days is all about dragging and dropping elements onto your web page.
How Much Money Can I Make Blogging?
I'd be honest here. Bloggers earn anywhere between $0 to a comfortable six-figure income. If you start with a free blog and try to cut corners when it comes to spending on SEO tools, you are likely to be towards the bottom end of that spectrum.
That does not mean you have to spend recklessly hoping to generate income fast. Nopes, that's not needed.
All you need to do is invest in one good SEO tool, one good lightweight theme, and one good page builder. This, along with lots of hard work should help you make it to the 5 or 6 digit income in the coming years.
What's The Best Way To Make Money Blogging?
I've been blogging for the past 7 years and from my experience, I can say that Affiliate Marketing is the best way to make money from blogging.
First, income from affiliate marketing is passive especially if you are promoting products that offer recurring commissions. So, even if your blog is going through a lean phase, you can still continue to generate a decent income.
Second, with affiliate marketing, you can choose the product you want to promote. Unlike ads, you won't be forced to show random products on your website.
Final Words
Blogging is one of the best ways to make passive income. However, most people dread starting a blog because they feel they don't have enough technical knowledge to manage a blog.
In this blog post, I have highlighted how you can create a blog without writing a single line of code. I've also made sure to pass on some extra knowledge that will help you become a better blogger.
So, if you want to start a blog in 2023, make sure to start it straightaway before you are too late to the party.